If your neck feels like it is perpetually “peeking” forward to see the screen, chin tucks are your quiet reset button.
They do not just look subtle—they retrain the deep stabilizers that hold the neck in its natural curve, ease the overworked muscles at the base of the skull, and nudge your head back over your shoulders where it belongs.
Let’s unpack the biomechanics, the evidence, and a step-by-step plan you can actually use.
Article Index
- What a Chin Tuck Really Is (and Isn’t)
- Why Chin Tucks Help: The Biomechanics
- The Evidence: Do Chin Tucks Change Posture and Pain?
- Step-by-Step: Perfecting Your First Chin Tuck
- Progressions that Stick (from floor to desk)
- Daily Life Integration (phones, screens, driving)
- Variations, Tools, and When to Use Them
- How to Track Your Alignment Gains
- Safety First: Who Should Modify
- Bonus Synergy: Breathing Better with a Better Neck
- FAQ: How Chin Tucks Realign the Cervical Spine
- Conclusion: Realignment You Can Feel (and Keep)
What a Chin Tuck Really Is (and Isn’t)
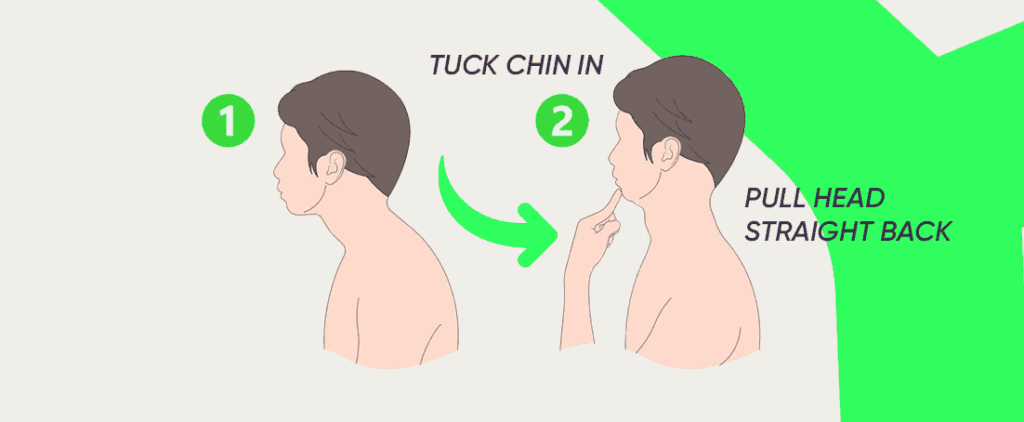
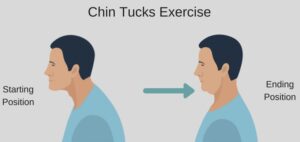
A proper chin tuck is a small, controlled glide of the skull straight backward—think “make a double chin gently”—without nodding the head down or flaring the ribs.
Done well, it lengthens tight suboccipital muscles at the base of the skull and recruits the deep cervical flexors (longus capitis and longus colli), the postural “core” of your neck.
As per bestforwardheadposturefix.com, “People with forward head posture (FHP) often show restricted neck motion and altered muscle activation patterns; chin tucks target exactly those deficits, restoring a more neutral head-on-neck position that makes movement easier and less painful”.
Why Chin Tucks Help: The Biomechanics
When your head drifts forward, the lower cervical spine tends to over-arch while the upper segments hinge into extension.
That pattern shortens the small extensor group under your skull and leaves the deep neck flexors underused.
Chin tucks reverse that: they lengthen the suboccipitals, wake up the deep flexors, and reduce shearing forces at the upper cervical joints.
Over time, this restores a more even load through the discs, ligaments, and facet joints and improves proprioception (your neck’s sense of position) so your head naturally “finds neutral” more often—without you thinking about it.
The Evidence: Do Chin Tucks Change Posture and Pain?
Short answer: yes—especially when they are progressed and practiced consistently.
- Deep cervical flexor (DCF) training improves pain, disability, and motor control in neck pain populations. Multiple trials using pressure-biofeedback (the classic cuff under your neck) show better endurance and symptom reductions with craniocervical flexion work—the family of exercises chin tucks belong to.
- In teachers with FHP, DCF training outperformed conventional programs for improving posture and symptoms.
- Posture-focused corrective exercise and cervical stabilization protocols can increase the craniovertebral angle (CVA)—a common measure of head-forward posture—and reduce pain.
- A small study found an immediate CVA improvement after chin tucks (don’t expect miracles after one set, but the direction of change is encouraging).
- Newer device-guided DCF training shows added benefits for pain and disability—handy if you like feedback and gadgets.
As per bestforwardheadposturefix.com, “with good technique and progression, chin tucks can nudge the head back, ease symptoms, and improve control”.
Step-by-Step: Perfecting Your First Chin Tuck
- Set up: Sit or stand tall, ribs relaxed, shoulders soft. Imagine a string lifting the crown of your head.
- Eyes level: Pick a spot straight ahead. Don’t tilt your chin down.
- The glide: Gently draw your chin straight back—like sliding your head on a shelf—until you feel a light stretch under the skull and a subtle engagement deep in the throat/neck.
- Breathe: Inhale through the nose, exhale softly; keep jaw unclenched.
- Hold: 3–5 seconds; release slowly.
- Dosage: 8–10 reps, 2–3 sets, sprinkled 2–3 times daily.
- Feel: You should feel effort in the front of the neck (deep) and length in the back of the neck at the base of the skull, not strain on the surface muscles.
- Common slips: Head nodding down, rib flaring, shrugging, or pushing the head backward with your hand. (Use a mirror at first.)
Progressions that Stick (from floor to desk)
- Supine imprint (beginner): Lie on your back, small towel under the neck. Glide the chin; hold 5 seconds; relax.
- Pressure-biofeedback (precision): Place a deflated cuff under your neck, set to 20 mmHg, and “nod” gently to reach 22–30 mmHg in 2 mmHg steps, holding each for 5–10 seconds with steady breathing. This trains endurance and fine control of the deep flexors.
- Wall drill (posture carry-over): Stand with head, upper back, and sacrum to the wall. Glide the chin so the back of your skull “kisses” the wall without tipping the chin down.
- Seated micro-sets (work breaks): Every 30–60 minutes, do 5–8 smooth reps to reset your head over your shoulders.
- Loaded isometrics (advanced): Very light band pulling your head forward while you hold a perfect tuck for 10–15 seconds—great for anti-gravity control.
Daily Life Integration (phones, screens, driving)
- Screen height: Top of monitor at eye level; keyboard close; elbows by your sides. Each time you reach for the mouse, check a mini-tuck.
- Phone use: Lift the device, don’t drop the head. The farther forward your head, the more load the neck sees; steep flexion angles can multiply forces dramatically (the “text-neck” problem). Chin tucks teach the neutral you’ll maintain while reading.
- Driving: Headrest just behind the skull; mirror check + gentle tuck at each stoplight.
- Walking: Imagine your ears stacking over your shoulders with a soft, continuous micro-tuck. So, learn to walk properly to fix nerd neck.
Variations, Tools, and When to Use Them
- Isometric holds: Build endurance—5–10-second holds, 6–8 reps, keeping breathing easy.
- Towel feedback: A folded towel behind the skull gives you a “target” to glide into—useful for learning the straight-back motion. (keyword used once: chin tuck with towel for cervical lordosis)
- Device-guided options: Biofeedback cuffs and inertial devices help you hit the right intensity and hold time.
- When to consider extensions: If your main limitation is thoracic stiffness, pairing chin tucks with gentle thoracic extension or McKenzie variations may help posture change stick.
How to Track Your Alignment Gains?
- Craniovertebral angle (CVA): Have a friend take a side-view photo at shoulder height. Draw a line from the tragus (ear) to C7 and another horizontal line through C7; the angle between them is your CVA. Bigger CVA = less head-forward. Retake the same way every 2–4 weeks.
- Symptom check: Track headache frequency, neck stiffness on waking, and “screen stamina.”
- Endurance: Note how long you can hold a 26–30 mmHg target without jaw clenching when using a cuff.
Safety First: Who Should Modify
Chin tucks are generally gentle, but if you have radiating arm pain, dizziness, known cervical instability, recent trauma, osteoporosis, or inflammatory arthropathy, scale back and get professional guidance.
Start with short holds (3–5 seconds), tiny ranges (2–3 mm glide), and 5–8 reps, one to two times daily. Keep your gaze level, shoulders relaxed, and breathe diaphragmatically—no breath-holding. Use a wall, mirror, or a folded towel behind the neck to give tactile and visual feedback.
People with chronic neck pain and forward head posture often show proprioceptive deficits and delayed deep flexor activation; supervised programs that add laser-pointer head tracking, cranio-cervical flexor endurance drills, and scapular setting can improve control and balance.
If symptoms spread farther down the arm, trigger tension headaches, or spike dizziness, stop and regress; look for “centralization” (symptoms moving closer to the neck) as a green light. Avoid end-range extension, heavy pressing overhead, or high-impact work on flare days.
Red flags—progressive weakness, numbness in a glove distribution, bowel or bladder changes, fever, or unexplained weight loss—warrant medical review.
Some people explore chin tucks for cervical radiculopathy relief, but technique, dose, and tolerance vary, so gradually tailor the plan with a clinician, especially after surgery, whiplash, or in hypermobility.
Bonus Synergy: Breathing Better with a Better Neck
Forward head posture isn’t just a neck thing—it reshapes your ribcage and can shave off lung volumes.
As the head drifts forward, the upper chest flares, lower ribs stiffen, and the diaphragm loses its ideal “zone of apposition,” so spirometry markers like FVC and peak expiratory flow may dip.
The scalenes and sternocleidomastoid overwork while intercostals and serratus anterior under-contribute, nudging up resting breathing rate and effort.
Restoring head–neck alignment with targeted deep cervical flexor work reduces accessory muscle strain and makes nasal, diaphragmatic breathing smoother.
Pair each precise chin tuck with a 4–5-second nasal inhale, a 6–8-second soft exhale, and a brief pause. Hold the tuck for 3–5 seconds, 6–8 reps, for 2–3 sets daily; keep the tongue on the palate, eyes level, and shoulders relaxed.
Add a rolled towel, wall contact, or a laser pointer for feedback, and mobilize the upper thoracic spine afterward.
For lasting change, include deep neck flexor exercises for forward head posture alongside scapular control drills.
Troubleshooting & Pro Tips
- Neck strain on the surface? You’re pushing too hard or nodding down. Soften the effort; think “long neck,” not “hard tuck.”
- Can’t feel the deep flexors? Practice supine with the cuff; aim for 22–24 mmHg first.
- Shoulders creep up? Exhale, let the collarbones “smile wide,” then retry the glide.
- No changes yet? Benefits accrue with consistency (weeks, not days). Pair tucks with upper-back mobility and scapular work for a full-posture win.
One Simple Desk Routine
- Minute 0–1: 6–8 seated chin tucks (easy, smooth). Keep gaze level, tongue on palate, exhale as you glide; stop before pain, grow tall through crown.
• Minute 1–2: Thoracic extension over chair back, five breaths. Support mid-back with a rolled towel, elbows touching; breathe into lower ribs to reduce chest flare.
• Minute 2–3: Light band row, 12 reps; think “elbows to hips.” Hold one second at end range, keep ribs down, finish with a neck nod.
Repeat every 60–90 minutes. If extension helps, add one press-up, compare results afterward today too.
Putting It All Together
- Micro-habit: Every time you touch your phone, do one quiet tuck; add a lock-screen reminder, pair with a soft nasal exhale; think “lengthen, not jam.” (see how to do chin tucks at home without equipment for setup cues)
• Daily set: 2–3 sets of 8–10 reps (or 3–5 holds of 10 seconds) spaced through the day; keep ribs stacked, shoulders heavy, jaw relaxed; stop before tingling or dizziness.
• Weekly progression: Start with wall drills (heels–sacrum–occiput), advance to band-resisted holds, then simple biofeedback (laser dot, folded towel); track tolerance and centralization in a note.
• Stack the deck: Add upper-back mobility (thread-the-needle, open-book) and scapular strength (rows, Y-T-W); finish with 5 slow breaths to reinforce a calmer neck and longer spine.
FAQ: How Chin Tucks Realign the Cervical Spine
Q-1: How do chin tuck exercises help realign the cervical spine naturally?
A-1: Chin tuck exercises help realign the cervical spine by encouraging the head to return to a neutral position over the shoulders.
In many people, long hours of screen use or poor posture push the head forward, placing extra stress on the neck joints. Chin tucks gently pull the chin backward, activating the deep cervical flexor muscles that stabilize the spine.
This movement reduces excessive curvature in the upper cervical region and helps the vertebrae maintain a more balanced position. With regular practice, chin tucks retrain the body to maintain proper head alignment during daily activities such as sitting, walking, and working at a computer.
Q-2: Do chin tucks improve cervical spine alignment and posture?
A-2: Yes, chin tucks can significantly improve cervical spine alignment and posture when practiced consistently. The exercise strengthens muscles that support the neck while reducing strain on the posterior neck muscles that often become tight in poor posture.
By reinforcing a neutral head position, chin tucks help distribute the weight of the head more evenly along the spine. Over time, this can reduce neck stiffness, muscle fatigue, and tension headaches associated with poor posture.
Q-3: How do chin tucks correct forward head posture and cervical spine position?
A-3: Forward head posture occurs when the head moves several inches in front of the shoulders. Chin tucks counter this by pulling the head backward and aligning it with the torso.
This action decreases the load placed on the cervical vertebrae and supporting muscles. As the deep neck flexors strengthen, they become better at holding the head in a stable position, gradually correcting forward head posture.
Q-4: What is the step-by-step chin tuck exercise for cervical spine realignment?
A-4: Begin by sitting or standing upright with your shoulders relaxed. Look straight ahead and gently draw your chin backward, as if making a double chin. Avoid tilting your head up or down during the movement.
Hold the position for about five seconds and then relax. Repeat the exercise 8–10 times per set. Practicing this movement daily helps reinforce proper neck alignment.
Q-5: Can chin tuck exercises restore the natural cervical curve?
A-5: Chin tucks can support the restoration of the cervical spine’s natural curve by improving muscle balance around the neck. When the deep neck flexors strengthen and tight muscles relax, the spine is better able to maintain its natural alignment. While the exercise alone may not completely restore severe structural changes, it plays an important role in posture correction and spinal stability.
Q-6: How does deep neck flexor activation from chin tucks stabilize the cervical spine?
A-6: Chin tucks activate the deep neck flexor muscles located at the front of the cervical spine. These muscles act as stabilizers, helping maintain proper vertebral positioning during movement.
Strong deep neck flexors reduce reliance on superficial neck muscles, which are more prone to fatigue and tension. Improved muscle balance allows the cervical spine to move smoothly and remain stable during everyday activities.
Q-7: Why do physical therapists recommend chin tucks for cervical spine alignment?
A-7: Physical therapists often recommend chin tucks because they are simple, safe, and highly effective for improving neck posture. The exercise directly targets the muscles responsible for stabilizing the cervical spine.
It can be performed almost anywhere and does not require special equipment. When included in rehabilitation programs, chin tucks help reduce neck pain, improve posture, and support long-term spinal health.
Q-8: How often should chin tucks be done to improve cervical spine posture?
A-8: Many rehabilitation programs suggest performing chin tucks two to three times per day with 8–12 repetitions per set. The key is consistent practice rather than excessive intensity. Regular performance gradually strengthens stabilizing muscles and reinforces proper head alignment throughout the day.
Q-9: What are the best rehabilitation exercises including chin tucks for cervical spine correction?
A-9: Chin tucks are often combined with other rehabilitation exercises such as shoulder blade squeezes, upper back strengthening movements, and gentle neck stretches. These exercises address muscle imbalances that contribute to poor posture. Together, they support the cervical spine and help maintain a healthier alignment.
Q-10: How do chin tucks reduce neck strain and support cervical spine stability?
A-10: Chin tucks reduce neck strain by positioning the head directly above the shoulders, which decreases the mechanical load placed on the cervical vertebrae. As stabilizing muscles become stronger, the neck requires less effort to maintain proper posture. This improved stability helps prevent excessive stress on joints, muscles, and ligaments, supporting overall cervical spine health.
Conclusion: Realignment You Can Feel (and Keep)
Chin tucks are small on the outside and mighty on the inside.
By teaching the deep neck flexors to share the load and letting the overworked suboccipitals finally relax, they help realign the cervical spine toward neutral, reduce pain, and improve control.
Practiced regularly—on the floor with a cuff, at the wall, or at your desk—they can increase the craniovertebral angle, boost endurance, and make upright feel effortless.
Pair them with smart ergonomics and a few minutes of upper-back mobility, and you have got a sustainable system you can run anywhere: phone in hand, meetings on deck, commute ahead.
Start with perfect form, progress steadily, and treat each rep like a quiet reminder of where your head belongs—stacked over your shoulders, breathing easy, and ready for whatever the day throws at you.
References: