A correct computer posture setup takes under 10 minutes to verify and follows one governing principle: neutral body positioning, where your head sits balanced over your torso, shoulders stay relaxed, elbows bend between 90° and 120°, and wrists run straight and parallel to the floor. Here is the 7-step checklist you can run right now.
Step 1: Chair height. Sit with feet flat on the floor (or a footrest). Knees should be roughly level with or slightly below your hips, at about 90°–100°. Quick fix: if your feet dangle, add a footrest; if your knees ride too high, raise the chair.
Step 2: Desk height and clearance. Your keyboard surface should sit at or just below elbow level. Thighs must clear the underside of the desk without pressing against it. Quick fix: if the desk is fixed too high, raise the chair and add a footrest.
Step 3: Monitor distance. Extend your arm straight ahead. Your fingertips should nearly touch the screen, placing it roughly 20–30 inches away. Quick fix: if you’re leaning forward to read, increase font size rather than moving closer.
Step 4: Monitor height. The top edge of the screen should sit at or slightly below your eye level so your gaze angles gently downward. Quick fix: use a monitor stand, a sturdy book, or a riser to raise a low screen.
Step 5: Keyboard and mouse placement. Both devices go on the same level, directly in front of you. Forearms stay roughly parallel to the floor. Quick fix: if elbows flare out, move the mouse closer to the keyboard.
Step 6: Laptop exception. A laptop used alone forces a trade-off: screen too low or keyboard too high. Add an external keyboard and mouse, then raise the laptop on a stand to eye level. Quick fix for travel: prop the laptop on a bag and use a wireless keyboard.
Step 7: Movement. No setup eliminates the risk of prolonged static posture. Stand, stretch, or walk briefly at least once per hour.
Key Takeaways
A correct computer posture setup requires measurable targets at every workstation element, combined with consistent movement habits and, for lasting neck alignment, deliberate muscle rebalancing work.
| Point | Details |
|---|---|
| Monitor distance and height | Place the screen 20–30 inches away with the top edge at or slightly below eye level. |
| Elbow angle target | Keep elbows at 90°–100° with forearms parallel to the floor for neutral wrist and shoulder position. |
| Move every hour | Change posture or take a short break roughly every hour; no setup eliminates static-posture risk. |
| Laptop users need peripherals | Add an external keyboard, mouse, and riser for sessions longer than a short period to avoid neck and wrist strain. |
| Bestforwardheadposturefix | Provides structured habit programs and science-backed correction methods to address forward head posture beyond the desk setup. |
Table of Contents
- How should you adjust your chair for neutral posture?
- Does your desk height actually fit your body?
- Where exactly should your monitor sit?
- How do you position your keyboard and mouse for neutral wrists?
- Using a laptop all day? Here’s what you actually need
- What does neutral posture actually look like at your desk?
- How often should you move during computer work?
- Lighting, glare, and where to put everything else
- Quick fixes for the most common setup problems
- Why your setup alone won’t fix forward head posture
- The measurement-first approach is what most guides skip
- Structured posture programs for lasting neck alignment
- Sources
How should you adjust your chair for neutral posture?
The chair is where most desk setups go wrong, and usually not because the chair is bad. It’s because no one adjusted it. Princeton University’s EHS office notes that correctly adjusted standard equipment often suffices, and that individual adjustment matters more than buying specialty gear.
The four adjustments that actually move the needle:
Seat height is the foundation. Raise or lower until your feet rest flat on the floor and your knees sit at roughly 90°–100°. If the chair goes high enough to put your elbows at keyboard level but your feet now dangle, add a footrest rather than lowering the chair.
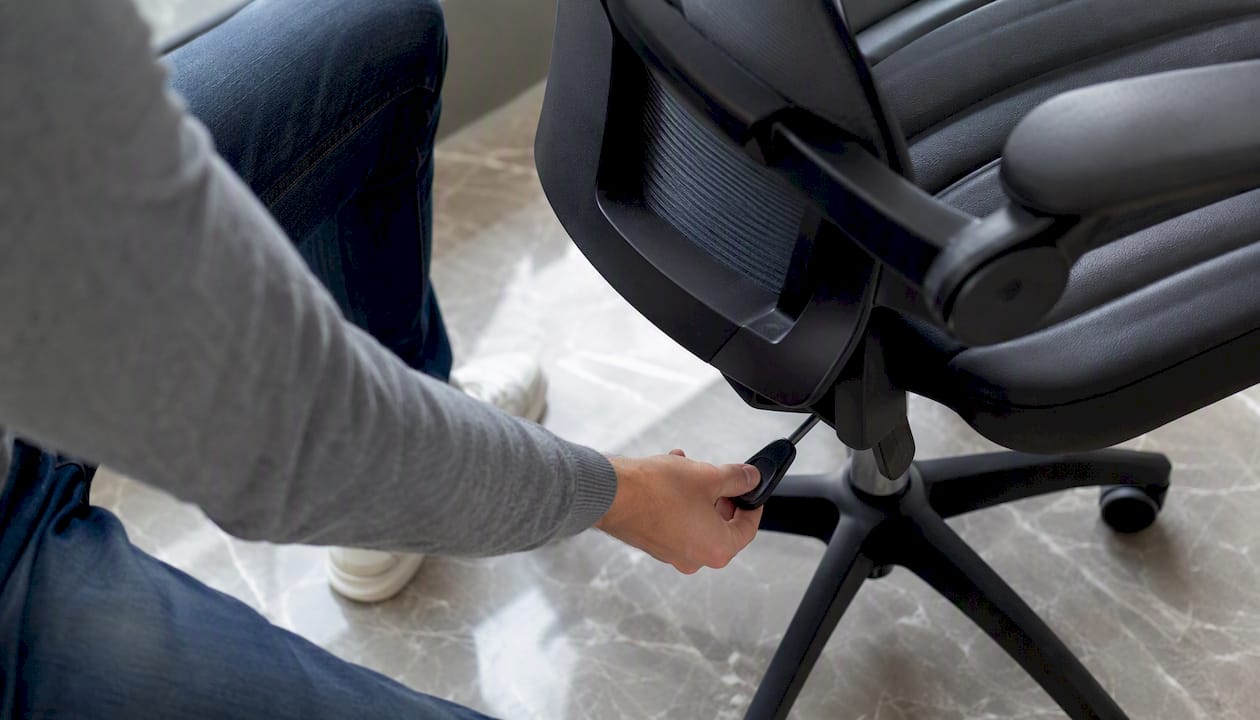
Seat depth is underused and underappreciated. Slide forward or back until there is a small gap between the front edge of the seat and the back of your knees. Too deep and you lose lumbar contact; too shallow and the seat edge digs into your thighs.
Lumbar support should press gently into the natural inward curve of your lower back, roughly at belt level. If the lumbar pad is fixed too high or too low, a small rolled towel placed at the right height works just as well.
Armrests are worth a separate note. They are often counterproductive for keyboard work because they can push you too far from the desk or force your shoulders upward. If your chair has them, set them to the lowest comfortable position, or fold them out of the way entirely during typing sessions.
| Chair Feature | Target Setting | Why It Matters |
|---|---|---|
| Seat height | Feet flat, knees 90°–100° | Supports hip/knee angle and reduces leg fatigue |
| Seat depth | 2–3 cm gap behind knees | Maintains lumbar contact without cutting off circulation |
| Lumbar support | Fills lower-back curve at belt level | Prevents slouching and reduces disc pressure |
| Armrests | Low or removed for typing | Prevents shoulder elevation and keeps elbows near torso |
| Base | 5-leg stable base | Prevents tipping during recline |
Pro Tip: Sit all the way back in the chair before adjusting lumbar height. Many people perch on the front half and then wonder why the lumbar support feels useless.
Ergonomic chairs that support head posture do more than cushion your back. The right lumbar position keeps your spine stacked, which in turn keeps your head from drifting forward.
Does your desk height actually fit your body?
Desk height is the variable most people treat as fixed when it often isn’t. The target: keyboard surface at or slightly below elbow level, with elbows bent at 90°–100° and forearms roughly parallel to the floor. If those two conditions are met, your shoulders stay down and your wrists stay neutral.
When the desk is fixed and too high, you have three practical options:
- Raise the chair until elbows align with the keyboard surface, then add a footrest to bring the floor back up to your feet.
- Add an adjustable keyboard tray that drops the keyboard below the desk surface. University of Washington EHS recommends trays large enough to hold both keyboard and mouse on the same level, keeping wrists straight and elbows near the torso.
- Use a sit-stand desk if you have access to one. Alternating between sitting and standing throughout the day reduces the cumulative load of any single static position.
Under-desk clearance matters too. You need enough vertical space to shift your legs, cross your ankles, and get close enough to the keyboard without hunching. A rough check: with your chair at the correct height, your thighs should clear the underside of the desk by at least a few centimeters. If they don’t, the desk is too low or the chair is set too high for that surface.
For a deeper look at setting up an ergonomic desk to fix neck posture, the principles of keyboard height and monitor alignment work together rather than independently.
Where exactly should your monitor sit?
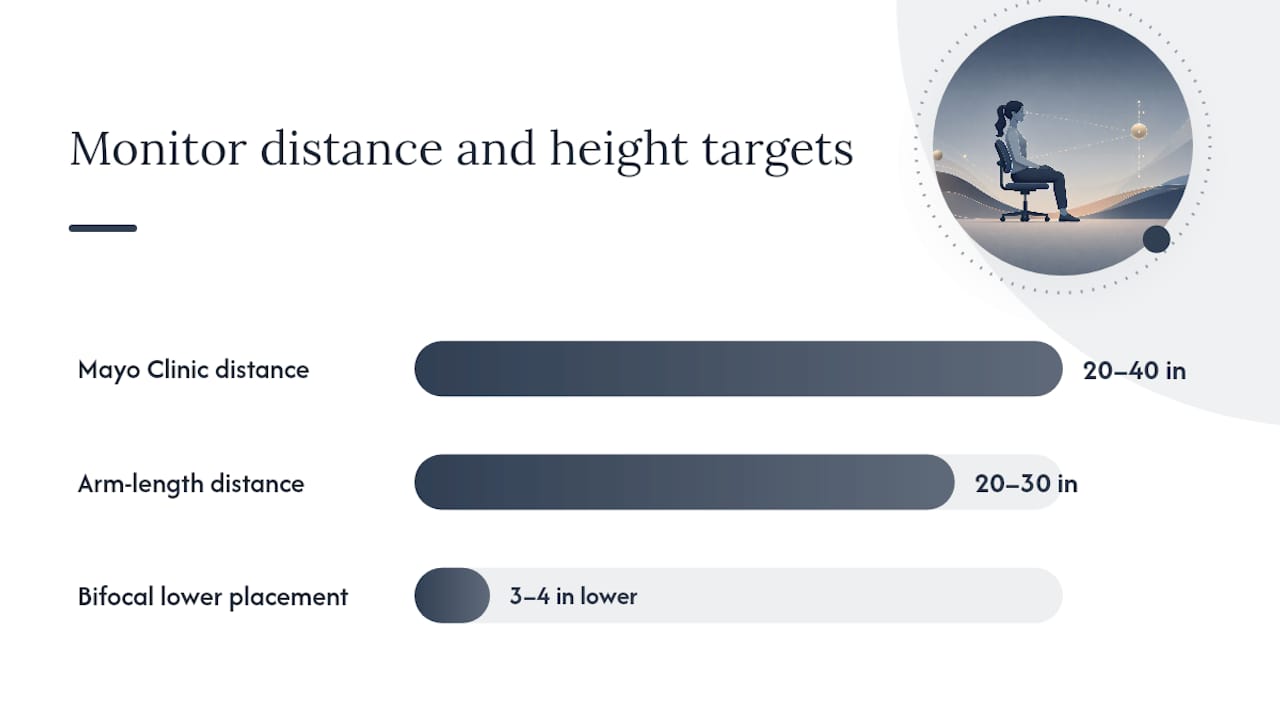
Monitor placement is the single biggest driver of computer neck pain, and the fix is almost always free. The Mayo Clinic’s office ergonomics guide puts the monitor no closer than 20 inches and no farther than 40 inches, with the top of the screen at or just below eye level.
The arm-length test is the fastest check: sit back in your chair, extend one arm straight ahead, and your fingertips should nearly graze the screen. That puts you in the 20–30 inch range.
Height is where people consistently go wrong. A monitor sitting on a desk surface is almost always too low, which pulls the head forward and down. Raise it until the top edge of the screen aligns with or sits slightly below your natural eye level. Your gaze should angle gently downward toward the center of the screen, not straight ahead or upward.
Bifocal and trifocal wearers need a lower position. If you tilt your head back to read through the lower lens, the screen is too high. Drop the top of the monitor 3–4 inches below standard eye level so you can read through the lower lens without extending your neck backward.
| Setup Variable | Target | Quick Verification |
|---|---|---|
| Monitor distance | 20–30 inches | Arm-length test: fingertips nearly touch screen |
| Top of screen | At or slightly below eye level | Sit back, look straight ahead: top edge at or just below gaze |
| Bifocal adjustment | 3–4 inches lower than standard | No backward head tilt needed to read through lower lens |
| Primary monitor (dual) | Directly in front of you | Nose points at primary screen without turning |
| Secondary monitor (dual) | Beside primary, slight inward angle | Used less often; head turns, not just eyes |
For dual monitors used equally, center both screens together so neither requires a sustained head turn. For a detailed walkthrough on dual monitor positioning without neck strain, the key is keeping the most-used screen in your straight-ahead line of sight.
How do you position your keyboard and mouse for neutral wrists?
Keyboard and mouse placement is where contact stress quietly accumulates. The goal is simple: both devices on the same level, directly in front of you, close enough that your elbows stay near your sides with forearms roughly parallel to the floor.
The neutral-wrist test takes five seconds. Rest your fingertips on the home row. Your wrists should be straight, not bent up, down, or sideways. If they angle upward, the keyboard is too high or tilted too far back.
Key placement rules:
- Keep the keyboard flat or with a slight negative tilt (legs folded in, back of keyboard lower than front). This prevents wrist extension, which is the position that loads the carpal tunnel.
- Place the mouse immediately beside the keyboard at the same height. Reaching forward or to the side for the mouse forces shoulder elevation and elbow extension.
- Avoid resting your wrists on the desk surface while typing. A wrist rest is for pauses between bursts of typing, not for use during active keystrokes.
Alternate input devices are worth knowing about. A vertical mouse keeps the forearm in a more neutral handshake position rather than a palm-down rotation. A trackball eliminates arm movement entirely. Neither is universally better, but both can reduce fatigue for people who already have wrist or shoulder discomfort.
Pro Tip: If your keyboard has a number pad on the right, your mouse ends up farther from your body’s centerline than it should be. A compact keyboard without a number pad brings the mouse closer and reduces shoulder reach.
Ergonomic keyboards and their effect on forward head posture is worth reading if you type for more than four hours a day. The keyboard angle affects not just your wrists but your shoulder position, which in turn affects your neck.
Using a laptop all day? Here’s what you actually need
Laptops are ergonomically compromised by design. The screen and keyboard are fixed together, which means if the screen is at eye level, the keyboard is too high; if the keyboard is at elbow level, the screen is too low. HSE’s display screen equipment guidance is direct: for extended use, external peripherals are the answer.
The minimal kit that fixes the problem:
- A laptop stand or riser to raise the screen to eye level.
- An external keyboard to keep your hands at elbow height.
- An external mouse placed beside the keyboard on the same surface.
That three-item setup costs less than most ergonomic chairs and solves the core problem completely. A docking station adds convenience but isn’t necessary for posture purposes.
For travel or short sessions where you can’t carry peripherals:
- Prop the laptop on a bag or books to raise the screen, and accept that you’ll type with slightly elevated arms for a short period.
- Reduce typing intensity: draft notes by hand or use voice-to-text for longer passages.
- Alternate tasks more frequently to break up static positions.
The key word is “extended.” Using a laptop flat on a desk for 20 minutes carries minimal risk. Using it that way for six hours every day is where computer neck syndrome develops.
What does neutral posture actually look like at your desk?
Neutral posture is not about sitting perfectly still. It’s about keeping your joints in positions where muscles aren’t working hard to hold you up. The OSHA evaluation checklist breaks this into specific checkpoints: head and neck aligned over the torso, back supported, shoulders relaxed, elbows close to the body, forearms parallel to the floor, wrists straight, and feet supported.
Here is the full alignment sequence, top to bottom:
- Head and neck: Ears sit directly over your shoulders. Your chin is neither tucked nor jutting forward. Looking straight ahead, you see the center of your monitor.
- Shoulders: Relaxed and level, not raised toward your ears or rolled forward.
- Upper back and spine: Upright, with the lumbar curve supported by the chair’s backrest.
- Elbows: Bent at 90°–100°, close to your sides, not flared outward.
- Forearms and wrists: Roughly parallel to the floor, wrists straight.
- Hips: Slightly above knee level, with the backrest angle between 90° and 110° for most people.
- Knees: At approximately 90°, with a small gap between the seat front and the back of your knees.
- Feet: Flat on the floor or fully supported on a footrest.
The photographic self-check is the fastest way to catch what you can’t feel. Set your phone to take a side-view photo while you’re working normally, not while you’re posing. Look for: is your ear over your shoulder, or is your head drifting forward? Is your lower back in contact with the chair, or are you perched on the front of the seat?
Pro Tip: Most people sit well for the first five minutes after adjusting their setup, then drift back into old habits. The photo check works best when you take it 30 minutes into a normal work session, not immediately after adjusting.
People at the shorter or taller ends of the height range often need to combine adjustments: a footrest plus a raised monitor, or a higher chair plus a keyboard tray. The measurements stay the same; only the combination of tools changes.
How often should you move during computer work?
Static posture is the real problem, and no chair or monitor position eliminates it entirely. Mayo Clinic is clear that sitting in the same position for hours is harmful regardless of how well the workstation is set up. Movement is not optional.
The practical target: change your posture or take a short break roughly every hour for continuous computer work. That doesn’t require a gym. It means standing for two minutes, walking to refill water, or doing 30–60 seconds of mobility work at your desk.
| Break Type | Duration | What to Do |
|---|---|---|
| Micro-break | 30–60 seconds | Neck rolls, shoulder circles, thoracic rotation |
| Posture reset | 1–2 minutes | Stand up, reset chair position, re-check monitor height |
| Movement break | 3–5 minutes | Short walk, standing stretch, stair climb |
| Sit-stand alternation | Every 30–60 min | Raise desk, stand for one task cycle, then sit again |
The behavioral piece matters as much as the physical one. Pair movement breaks with a recurring calendar reminder, a specific work cue (every time you finish a document, stand up), or a simple phone alarm. The people who actually move regularly are the ones who’ve made it automatic, not the ones who rely on willpower.
Lighting, glare, and where to put everything else
Glare on your screen is a posture problem, not just a visual one. When you can’t see clearly, you lean forward. Position your monitor perpendicular to windows rather than facing them or sitting with a window directly behind you. If overhead lighting creates reflections, a monitor hood or anti-glare screen filter solves it without rearranging the room.
Workspace layout rules that prevent repetitive twisting:
- Keep your phone, notepad, and reference documents within arm’s reach and roughly aligned with your monitor. Reaching repeatedly to one side loads the same muscles every time.
- Use a headset for calls when you’re also typing or mousing. Cradling a phone between your neck and shoulder is one of the fastest ways to develop one-sided neck pain.
- Task lighting for paperwork should illuminate the page without creating a bright reflection on your screen. Position it to the side, not directly above the keyboard.
Quick fixes for the most common setup problems
Most setup problems have a direct, immediate correction. Here are the ones that come up most often:
- Monitor too low: Raise it on a stand, riser, or a few sturdy books until the top edge reaches eye level. Do not tilt the screen upward as a substitute.
- Keyboard too high: Use an adjustable keyboard tray, raise the chair and add a footrest, or both.
- Wrists resting on the desk edge: The sharp edge of most desks creates contact stress on the soft tissue of the forearm. Add a wrist rest, use a wrist support pillow, or pad the edge with foam tape. This is an underappreciated source of forearm soreness.
- Neck tilting to one side: Usually caused by a secondary monitor placed too far to the side, or a phone cradled on one shoulder. Center the primary screen; use a headset.
- Lower back pain despite lumbar support: The lumbar pad may be positioned too high. Adjust it to the belt-line level, or add a small rolled towel at the correct height.
- Legs cramped under the desk: The desk is too low, the chair is too high for that surface, or there is equipment stored under the desk blocking leg movement. Clear the space and reassess desk height.
When adjustments don’t resolve persistent pain, that’s the signal to consult a clinician or a certified ergonomics specialist. Setup corrections help most people, but they don’t substitute for clinical assessment when pain is already established.
Why your setup alone won’t fix forward head posture
An optimized workstation reduces the mechanical load on your neck and spine. What it doesn’t do is correct the muscle imbalances and movement habits that develop after months or years of poor positioning. Forward head posture (FHP) involves shortened anterior neck muscles, weakened deep cervical flexors, and a learned postural pattern that persists even when the desk is perfectly arranged.
The four-step habit plan that bridges setup and correction:
- Awareness cues: Set a recurring reminder to check your head position. The question is simple: is your ear over your shoulder right now?
- Micro-exercises: Short chin tucks, shoulder blade squeezes, and thoracic extension breaks done at the desk begin retraining the muscles that hold your head back.
- Progressive strengthening: Deep neck flexor work and upper back strengthening, done consistently over weeks, rebuild the capacity to hold neutral alignment without effort.
- Daily recall checkpoints: Link a posture check to something you already do, such as every time you open a new browser tab or pick up your coffee.
Fixing tech neck through better typing posture connects the desk setup directly to the muscle rebalancing work that produces lasting change. Bestforwardheadposturefix provides structured routines, detailed habit programs, and science-backed correction methods for readers who want to go beyond the setup checklist and address the underlying pattern.
The measurement-first approach is what most guides skip
Most ergonomics articles tell you to “sit up straight” and “keep your monitor at eye level.” What they skip is the measurement. Telling someone to sit up straight without telling them what 90° at the elbow actually feels like, or how to verify monitor distance with their arm, produces the same vague awareness that fades by lunch.
The setups that actually hold are built on numbers you can check: 20–30 inches of monitor distance, 90°–100° at the elbow, a 2–3 cm gap behind the knees. Those are things you can measure with a ruler or verify with a phone photo. They don’t require guessing.
The second thing most guides miss is the habit layer. A perfect setup on Monday morning drifts by Wednesday afternoon. The people who sustain good posture are the ones who’ve built a short daily check into their routine, not the ones who adjusted their chair once and hoped for the best. Small, measurable changes made consistently produce better outcomes than a single comprehensive overhaul that nobody maintains.
Structured posture programs for lasting neck alignment
Workstation adjustments give you the foundation. Bestforwardheadposturefix takes you further with structured, science-backed programs designed to correct forward head posture at the habit and muscle level, not just the furniture level. The site’s in-depth guides cover awareness building, progressive strengthening, and daily correction routines that work alongside your ergonomic setup.

If you’ve set up your desk and still feel neck stiffness or headaches, the next step is addressing the underlying postural pattern. Visit Bestforwardheadposturefix to access the full library of posture correction resources and find the program that fits your situation.
Sources
- eTools : Computer Workstations – Positions | Occupational Safety and Health Administration
- Safety
- Office ergonomics: Your how-to guide – Mayo Clinic
- Setting Up Your Workstation | Office of Environmental Health and Safety – Princeton University
- Adjust your workstation | Environmental Health & Safety – University of Washington
- How to make your computer workstation fit you | WorkSafeBC
- Working safely with display screen equipment – HSE
This article is general information, not a substitute for advice from a qualified doctor. Consult a qualified healthcare professional about your own circumstances before acting on anything here.