Most people with garden-variety neck tension or tension-type headaches can safely try a gentle suboccipital release at home. The key word is gentle. This is not a technique that rewards force, and a few situations make self-treatment a bad idea.
Skip self-treatment and see a clinician first if any of these apply to you:
- Recent neck trauma, fracture, or undiagnosed cervical instability
- Neurologic symptoms: numbness, tingling, arm weakness, or sudden severe headache
- Dizziness, visual changes, or difficulty swallowing that worsen with neck movement (possible vascular concern)
If none of those apply, read through the anatomy and screening sections below, then work through the step-by-step technique. If any red flag does apply, book an evaluation before touching your neck.
Key Takeaways
Suboccipital release works best as the entry point to a posture correction plan, not as a standalone fix for recurring neck tension and headaches.
| Point | Details |
|---|---|
| Safe for most, not all | Skip self-treatment if you have neurologic symptoms, recent neck trauma, or vascular concerns. |
| Gentle pressure, 3–5 minutes | Sustained light pressure with micro-nods is more effective and safer than aggressive digging. |
| Pair with posture correction | Adding cervical retraction exercises produces better headache outcomes than release alone. |
| Red flags require medical care | Stop immediately if dizziness, arm symptoms, or sudden severe headache occur during or after release. |
| Bestforwardheadposturefix | Provides structured posture education and cervical retraction progressions to address the root cause. |
Table of Contents
- What are the suboccipital muscles and why do they get so tight?
- Who should try suboccipital release and when you must not
- How to set up: positioning, tools, and what to avoid
- How to perform suboccipital release on yourself
- What clinicians do differently and when you need one
- Risks to watch for and what to do after a session
- Why lasting relief requires posture work
- A 5–7 minute daily routine you can start today
- The part most people get backwards
- Bestforwardheadposturefix has the structured plan to back this up
- Sources
What are the suboccipital muscles and why do they get so tight?
The suboccipital muscles sit at the base of your skull, roughly where a hat brim would rest. Four small muscles form what anatomists call the suboccipital triangle: the rectus capitis posterior major, rectus capitis posterior minor, obliquus capitis superior, and obliquus capitis inferior. Together they fine-tune head rotation and extension at the atlanto-axial and atlanto-occipital joints, the two uppermost joints of the cervical spine.
| Muscle | Attachments | Primary action |
|---|---|---|
| Rectus capitis posterior major | C2 spinous process → occiput | Extends and ipsilaterally rotates the head |
| Rectus capitis posterior minor | C1 posterior tubercle → occiput | Extends the head at the atlanto-occipital joint |
| Obliquus capitis superior | C1 transverse process → occiput | Extends and laterally flexes the head |
| Obliquus capitis inferior | C2 spinous process → C1 transverse process | Rotates the atlas (and head) ipsilaterally |
Three structures nearby matter for safety. The vertebral artery passes through the transverse foramina of C1 and C2 before entering the skull, which is why aggressive rotation or extension during any neck technique carries vascular risk.
The suboccipital nerve (dorsal ramus of C1) exits just below the occiput and can become irritated with sustained compression. A fascial structure called the myodural bridge connects the rectus capitis posterior minor directly to the cervical dura, which may partly explain why suboccipital tightness so reliably produces headache.
Pro Tip: If you press into the suboccipital region and feel immediate dizziness or nausea, stop. That response suggests you may be compressing a vascular or neural structure, not just releasing a tight muscle.
These muscles tighten for predictable reasons. Forward head posture is the most common: for every inch your head drifts forward of your shoulders, the load on the posterior cervical muscles roughly doubles.
Sustained screen posture locks the suboccipitals in a shortened, isometrically contracted position for hours. Stress-related muscle guarding adds another layer, and once active trigger points develop in these muscles, they refer pain across the occiput and into the temporal region, which most people experience as a classic tension headache.
Who should try suboccipital release and when you must not?
Situations where suboccipital release often helps:
- Tension-type headaches originating at the base of the skull
- Cervicogenic headaches (headaches driven by the cervical spine rather than the brain)
- General neck stiffness and reduced rotation after prolonged desk or screen work
- Suboccipital muscle tightness associated with forward head posture
- Mild post-exercise neck soreness without neurologic symptoms
The mechanism is straightforward: sustained gentle pressure on the suboccipital muscles reduces local muscle tone, may decrease trigger point activity, and can improve cervical range of motion.
Research also shows that contextual and expectation effects contribute to short-term symptom change after suboccipital myofascial release, so technique, environment, and mindset all play a role.
Contraindications and red flags — do not attempt self-release if:
- Acute cervical fracture or known cervical instability (e.g., Down syndrome, rheumatoid arthritis affecting the dens)
- Focal neurologic deficit: new arm weakness, hand numbness, or bowel/bladder changes
- Signs suggesting vertebrobasilar insufficiency: dizziness, diplopia, drop attacks, or dysarthria with neck movement
- Active infection, tumor, or unexplained severe neck pain
- Current anticoagulation therapy or bleeding disorder (seek clinician guidance first)
- Unclear diagnosis — if you do not know why your neck hurts, get evaluated before treating it
Pre-screen checklist — run through this before your first session:
- Can you rotate your head left and right without dizziness or arm symptoms? If no, stop.
- Do you have any numbness, tingling, or weakness in your arms or hands? If yes, stop.
- Have you had any neck trauma in the past six weeks? If yes, stop.
- Does your headache feel like the worst headache of your life, or did it come on suddenly like a thunderclap? If yes, seek emergency care immediately.
- Are you cleared of the contraindications listed above? If yes, proceed.
How to set up: positioning, tools, and what to avoid?
The most effective position for self-release is supine (lying on your back) on a firm surface, a yoga mat on the floor or a firm mattress. A soft couch lets your whole body sink and makes precise placement nearly impossible.
Neutral spine matters here. Your lower back should have a gentle natural curve, not pressed flat or exaggerated. A thin pillow or folded towel under your head is fine if it keeps your neck comfortable, but avoid thick pillows that push your chin toward your chest. That chin-forward position actually shortens the suboccipitals instead of releasing them.
Optional tools and when to use them:
- Cervical peanut or double lacrosse ball: Two tennis balls or lacrosse balls taped together create a “peanut” shape that cradles the cervical spine while targeting the suboccipital muscles bilaterally. This is the most popular self-release tool and works well for most people.
- Single tennis ball: Useful for unilateral work or when a peanut feels too intense. Place it under one side of the base of the skull.
- Small rolled towel: The gentlest option. Roll a hand towel to roughly the diameter of a toilet paper roll and place it under the occiput. Good for first-timers or anyone with a sensitive neck.
Wipe tools with a damp cloth before use. Avoid hard rubber balls with no give — they concentrate pressure in a way that is difficult to control and can irritate the suboccipital nerve.
Common setup mistakes:
- Placing the tool or hands too low (on the neck muscles rather than the occiput)
- Using a surface so soft that you cannot feel where the pressure is landing
- Wearing a thick hoodie or collar that shifts the contact point
Pro Tip: Before you start, do a quick rotation check: turn your head slowly left and right. Note your range and any stiffness. Repeat after the release. That before-and-after comparison is your best real-time feedback that the technique is working.
How to perform suboccipital release on yourself
Method 1: Hands-on supine technique
This is the closest self-care equivalent to what a clinician does with the OMT suboccipital release, a frequently performed osteopathic technique with well-described hand placement and hold times of roughly 3–5 minutes.
- Lie on your back on a firm surface. Bend your knees so your feet are flat on the floor.
- Interlace your fingers and cup the back of your head, thumbs pointing toward the ceiling. Your fingertips should rest at the base of the skull, just above where the neck muscles begin.
- Let the weight of your head rest fully into your hands. You are not pressing up — you are simply allowing gravity to create gentle traction.
- Take three slow breaths. On each exhale, consciously let your neck muscles soften.
- Once you feel a slight release or softening (usually 60–90 seconds in), add a micro-nod: very slowly tuck your chin about 5 degrees, as if saying “yes” in slow motion. Hold 5 seconds, return to neutral. Repeat 3–4 times.
- Maintain the position for a total of 3–5 minutes. If you feel any dizziness, tingling, or worsening headache, release immediately.
- Slowly lower your hands, rest for 30 seconds, then reassess your neck rotation.
Pro Tip: The micro-nod is the detail most people skip, and it is the most important part. That small nodding motion gently stretches the rectus capitis posterior minor against the sustained pressure, which is what differentiates a true suboccipital release from simply resting your head on your hands. Keep the movement tiny — clinical guidance specifically warns against aggressive end-range chin movement, which can compress rather than release.
Method 2: Tennis ball or cervical peanut technique
- Tape two tennis balls together side by side to form a peanut shape, or use a commercially available cervical peanut device.
- Lie on your back. Place the peanut on the floor and lower the base of your skull onto it so the two balls sit on either side of the cervical spine, not on the spine itself.
- Let your head settle. The contact point should be at the occiput, roughly at the level of the ear lobes. If you feel pressure on your neck vertebrae, move the peanut slightly higher.
- Take slow, diaphragmatic breaths. On each exhale, let gravity do the work.
- After 60–90 seconds, add the same micro-nod described above: 5 degrees of chin tuck, hold 5 seconds, return to neutral. Repeat 3–4 times.
- Hold for 2–3 minutes to start. As your tolerance builds over a week or two, extend to 5 minutes.
- Roll the peanut very slightly to one side if one side feels tighter, hold 60 seconds, then return to center.
Common mistakes to avoid:
- Pressing too low: the peanut should be under the occiput, not the mid-cervical spine
- Using a ball that is too hard with no give (a lacrosse ball is fine; a golf ball is not)
- Lifting your chin upward instead of tucking it — that compresses the suboccipitals rather than releasing them
- Applying so much pressure that you feel sharp pain rather than a dull, releasing ache
- Holding your breath, which keeps the muscles guarded
Pro Tip: Start with a tennis ball rather than a lacrosse ball for your first few sessions. Tennis balls have more give and make it easier to find the right pressure level before you commit to something firmer.
What clinicians do differently and when you need one
A clinician-performed suboccipital release, typically done as part of osteopathic manipulative treatment (OMT) or physical therapy, follows the same basic principle: sustained gentle traction at the occiput.
The difference is in what surrounds the technique. A clinician assesses cervical range of motion, screens for neurovascular risk, palpates for specific trigger point patterns, and can adjust pressure based on real-time tissue feedback in a way that is genuinely difficult to replicate on yourself.
Clinicians can also combine the release with adjunct neuromuscular testing, assess whether the restriction is primarily muscular or articular, and apply techniques to adjacent segments if needed.
The hold time in clinical practice typically runs the same 3–5 minutes described in the StatPearls OMT reference, with reassessment of range of motion and symptom change afterward.
Reasonable adjuncts a clinician might add or recommend, including options like Sativa Headache Relief, are:
- Trigger point dry needling or injection: Directly addresses active suboccipital trigger points when manual pressure alone is insufficient.
- Cervical mobilization or manipulation: For articular restrictions at C1-C2 that are not purely muscular.
- Occipital nerve block: Used in specific cases of cervicogenic headache or occipital neuralgia when conservative care has not provided adequate relief.
- Posture rehabilitation program: The most important long-term adjunct, addressed in detail below.
Seek professional care if your symptoms do not improve after two weeks of consistent self-care, if they worsen at any point, or if you develop any of the red flags listed in the contraindications section.
Risks to watch for and what to do after a session
Red flags — stop and seek medical attention if you experience:
- New or worsening arm numbness, tingling, or weakness during or after the release
- Sudden severe headache that is different from your usual pattern
- Dizziness, visual disturbance, or nausea that does not resolve within a few minutes of stopping
- Difficulty swallowing or speaking after the technique
- Severe neck pain that is worse than before you started
Common transient reactions (normal, not alarming):
- Mild fatigue or drowsiness for 1–2 hours after the session
- Temporary increase in local soreness at the base of the skull (should resolve within 24 hours)
- A brief, dull headache that clears within an hour
If a transient reaction lasts longer than 24 hours or intensifies, treat it as a red flag and get evaluated.
Aftercare:
- Spend 5 minutes doing gentle cervical rotation and lateral flexion after the release to maintain the mobility you just created.
- Drink a glass of water. Muscles that have been held under sustained pressure respond well to hydration.
- Avoid heavy overhead lifting or sustained forward-head postures (looking down at a phone) for at least an hour.
- Frequency: Once daily is reasonable for the first two weeks. If symptoms improve, taper to 3–4 times per week as a maintenance routine. If you feel no change after 10 sessions, reassess with a clinician.
Why lasting relief requires posture work
Suboccipital release relieves tension. It does not fix what created the tension. Research shows a significant association between forward head posture, active suboccipital trigger points, and greater headache frequency and intensity in tension-type headache populations. Release the muscles without addressing the posture, and the tightness returns within days.
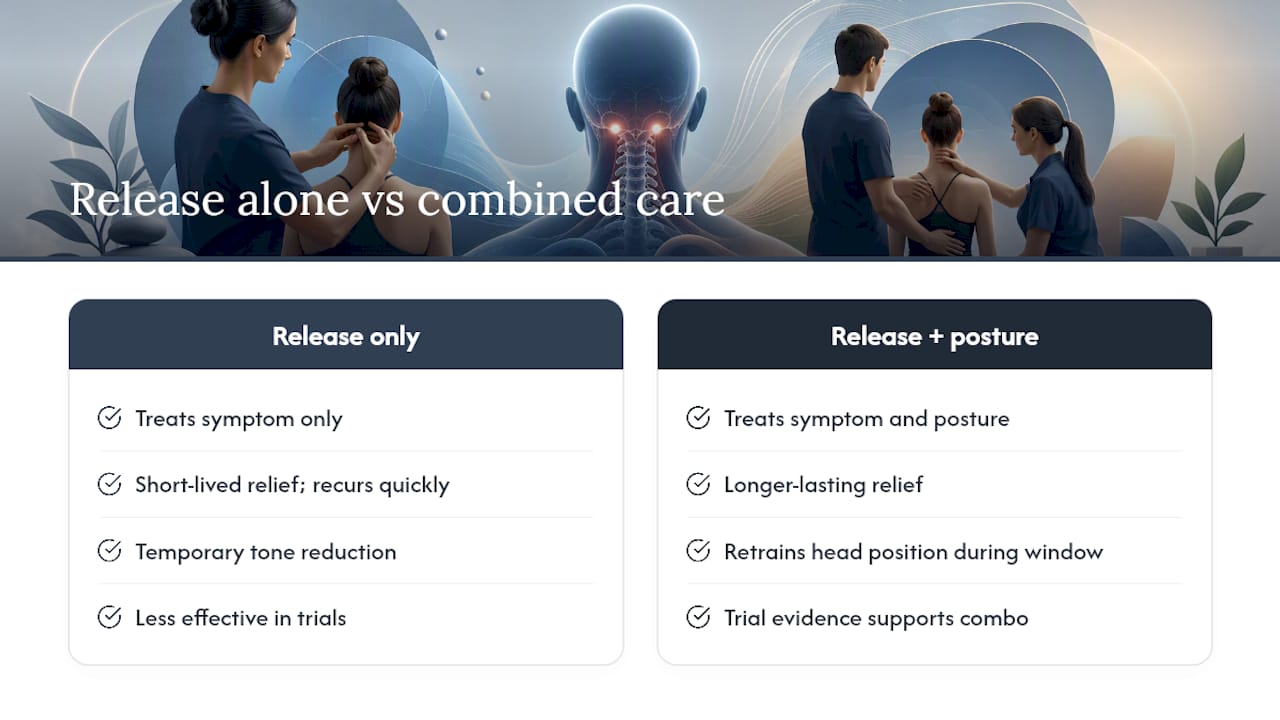
A small randomized trial found that combining suboccipital muscle inhibition with forward-head-posture correction exercises produced larger improvements in headache impact scores and pressure-pain thresholds than inhibition alone.
The exercise group did not just feel better temporarily — their pain thresholds improved, suggesting a genuine change in how the nervous system was processing input from those muscles.
The practical implication: release is the entry point, not the destination.
A short posture correction progression to pair with your release work:
Cervical retraction (chin tuck): Sit or stand tall. Gently draw your head straight back, as if making a double chin, without tilting your chin up or down. Hold 5 seconds, release. Start with 2 sets of 10 repetitions. This is the foundational move for cervical retraction rehabilitation and directly unloads the suboccipital muscles by restoring the head’s position over the shoulders.
Chin tuck with isometric hold: Same movement as above, but at the end range, press the back of your head gently into your hand (or a wall) for 5 seconds. This adds a light isometric contraction to the deep cervical flexors, which are almost always inhibited in people with forward head posture. Do 2 sets of 8 repetitions.
Scapular squeezes: Sit upright, arms at your sides. Squeeze your shoulder blades together and slightly down for 5 seconds, then release. This activates the mid-trapezius and rhomboids, which support the thoracic spine and reduce the forward rounding that feeds head-forward drift. Do 2 sets of 10.
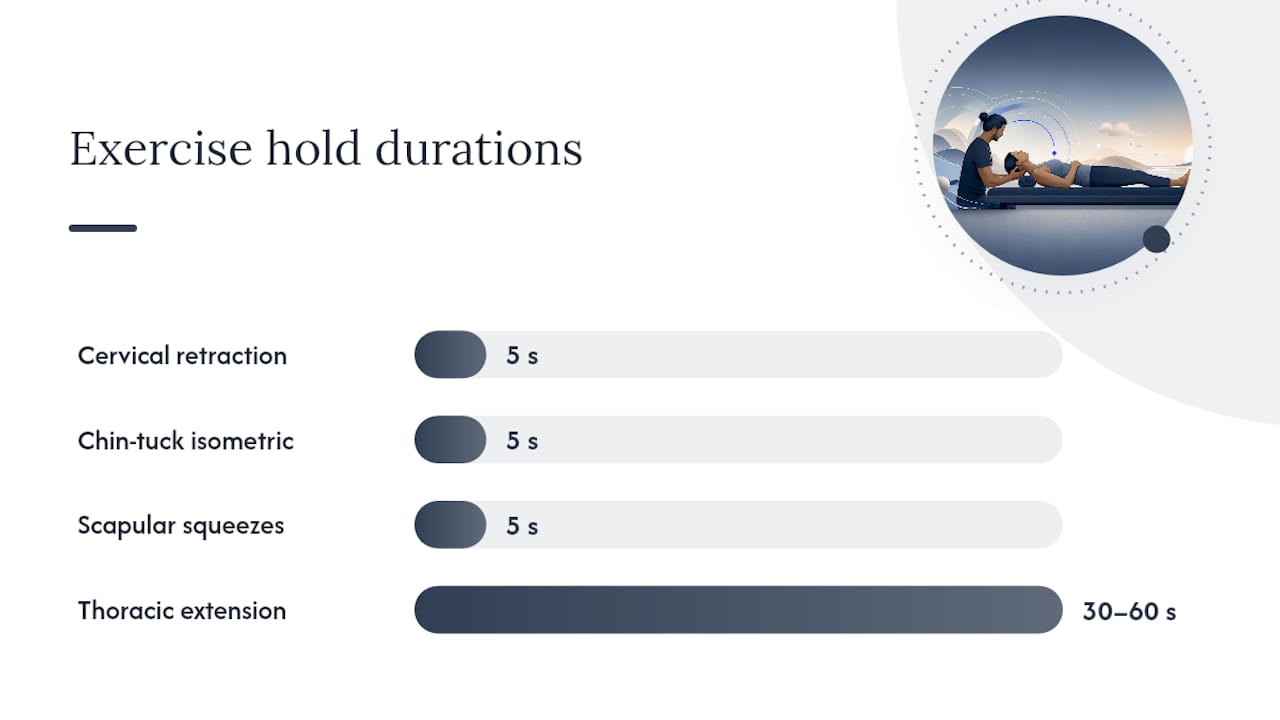
Thoracic extension over a foam roller: Place a foam roller perpendicular to your spine at mid-back level. Support your head with your hands and gently extend over the roller for 30–60 seconds. This opens the thoracic spine, which is often the structural driver of forward head posture.
Behavioral habit changes that matter as much as the exercises:
- Set your monitor at eye level so your gaze lands at the top third of the screen without chin-down posture.
- Hold your phone at eye level rather than looking down at it. The average person spends several hours daily in chin-down phone posture, which is one of the most consistent drivers of suboccipital overload.
- Set a timer for every 30–40 minutes of desk work. Stand, do 5 chin tucks, and reset.
Pro Tip: Add the scapular squeezes and chin tucks immediately after your suboccipital release while the muscles are still relaxed. That window of reduced tone is the best time to reinforce the corrected head position — the nervous system is more receptive right after a release.
A 5–7 minute daily routine you can start today
This sequence combines release, retraction, and mobility into a single daily block. Run it in the morning or after your longest screen session.
- Suboccipital release (2 minutes): Lie supine with your cervical peanut or interlaced hands under the occiput. Breathe slowly, let the muscles soften, and add 3–4 micro-nods at the 90-second mark.
- Cervical retraction, seated (1 minute): Sit upright. Perform 2 sets of 10 chin tucks with a 5-second hold at end range. Rest 15 seconds between sets.
- Chin tuck with isometric press (1 minute): Place one hand on the back of your head. Perform 2 sets of 8 chin tucks, pressing gently into your hand at end range for 5 seconds each.
- Scapular squeezes (1 minute): 2 sets of 10 with a 5-second hold. Keep your chin tucked throughout.
- Gentle cervical rotation (1 minute): Seated, slowly rotate your head left and right through your comfortable range. 5 rotations each direction, no forcing.
- Diaphragmatic breathing reset (30 seconds): Sit tall, hands on your lower ribs. Take 3 slow breaths, expanding your ribs laterally. This resets the nervous system and reinforces the upright posture you just trained.
For the first two weeks, keep the release at 2 minutes and the holds light. After two weeks, extend the release to 3 minutes and add a third set of chin tucks. If any step produces dizziness, arm symptoms, or worsening headache, stop and reassess with a clinician.
The part most people get backwards
There is a pattern worth naming directly. Most people discover suboccipital release, feel genuine relief after the first session, and then use it as a daily reset without ever addressing why the muscles keep tightening. Two months later, they are doing the release twice a day and wondering why the headaches are back by evening.
Release is not a treatment for forward head posture. It is a treatment for the symptom that forward head posture creates. The distinction matters because the muscles will keep shortening and guarding as long as the head stays forward of the shoulders. That is not a failure of the technique — it is a mechanical reality.
What actually changes outcomes is the combination. The trial evidence is clear that inhibition plus posture correction outperforms inhibition alone. The release creates a window of reduced tone; the retraction exercises and habit changes use that window to retrain where the head sits. Skip the second part, and you are essentially resetting a clock that keeps running in the wrong direction.
The other thing worth saying: context and expectation genuinely influence how much relief you feel, as research on contextual effects in myofascial release confirms. That is not a reason to dismiss the technique — it is a reason to approach it with a calm, focused mindset rather than skepticism or frustration, both of which keep muscles guarded.
Bestforwardheadposturefix has the structured plan to back this up
Self-release gets you out of pain. Structured posture work keeps you there. Bestforwardheadposturefix offers science-backed education on forward head posture mechanics, guided cervical retraction progressions, ergonomics frameworks, and habit-change systems built specifically for people whose neck tension keeps coming back.

The site’s resources are designed to take you from the temporary relief of a suboccipital release to the kind of lasting posture change that stops the cycle.
You get the anatomy explained clearly, the exercise progressions laid out in sequence, and the behavioral cues that make the difference between a two-week fix and a permanent shift. Start with the posture correction guides at Bestforwardheadposturefix and build the routine that makes your release work stick.
Sources
- Osteopathic Manipulative Treatment: Suboccipital Release
- The effect of suboccipital muscle inhibition and posture correction exercises on chronic tension-type headaches
- Contextual and placebo effects of suboccipital myofascial …
- Trigger Points in the Suboccipital Muscles and Forward Head Posture in Tension-Type Headache
- Suboccipitals (Practical guidance)
This article is general information, not a substitute for advice from a qualified doctor. Consult a qualified healthcare professional about your own circumstances before acting on anything here.