The five exercises with the strongest evidence for correcting forward head posture are chin tucks, supine chin tuck and curl, doorway pec stretch, scapular rows or Wall Angels, and prone Y-T-I. Do them in that order, starting today. If you feel pain radiating down your arm, new numbness, or sudden weakness during any of these moves, stop immediately and see the red flags section below.
The top five exercises to start right now:
- Chin tucks (deep neck flexor activation): 10 reps, hold 2–4 seconds each, repeat several times throughout the day
- Supine chin tuck and curl: multiple repetitions lying on your back, performed in 1–2 sets
- Doorway pec stretch: 30-second hold each side, 2–3 times daily
- Scapular rows or Wall Angels: 10–12 reps, 2–3 sets, 3 times per week
- Prone Y-T-I: 10 reps per position, 2 sets, 3 times per week
Pro Tip: Micro-dose the chin tuck. A set of 10 reps every hour at your desk does more for deep neck flexor endurance than one long session at the gym. Set a phone reminder.
According to Cleveland Clinic, forward head tilt dramatically increases the mechanical load on the cervical spine, with estimates suggesting the neck must support a substantially increased weight at common tilt angles. That load is why passive stretching alone rarely solves the problem.
Key Takeaways
Correcting forward head posture requires a phased approach: release tight tissues, then activate and strengthen the deep neck flexors and upper back, while micro-dosing movement throughout the day.
| Point | Details |
|---|---|
| Start with chin tucks daily | Do 2–3 sets of 10 reps multiple times per day to retrain deep neck flexors. |
| Strengthen upper back 3× per week | Wall Angels, prone Y-T-I, and resistance band rows correct the muscle imbalance driving FHP. |
| Change position every 20 minutes | Frequent movement prevents cumulative cervical load better than any single static posture. |
| Track progress with photos | Side-profile photos every 4–8 weeks give objective evidence of postural change. |
| Seek help for neurological signs | Radiating arm pain, numbness, or progressive weakness require clinical evaluation, not more exercises. |
Table of Contents
- How do you know if you have forward head posture?
- Why forward head posture develops and which muscles to target
- Your phased forward head posture workout: step-by-step program
- How long does it take to see real improvement?
- When should you stop exercising and see a clinician?
- What clinicians actually say about fixing tech neck
- Why Bestforwardheadposturefix recommends this phased approach
- Sources
How do you know if you have forward head posture?
A side-profile photo is the most reliable self-test you can do at home. Stand naturally against a wall, have someone take a photo at shoulder height from your side, and draw an imaginary vertical line from your ear straight down. If your ear sits noticeably in front of your shoulder, you have some degree of forward head posture (FHP), the clinical term for what is also called “tech neck” or “text neck.”
Three-step quick check:
- Mirror test: Stand sideways in front of a full-length mirror in your normal resting posture. Note where your ear falls relative to the tip of your shoulder.
- Wall test: Stand with your back against a wall, heels and shoulder blades touching. Can the back of your head touch the wall without straining? If you have to tuck your chin hard or cannot reach the wall at all, that is a positive sign of FHP.
- Ear-to-shoulder distance: With a soft tape measure, estimate the horizontal distance from your earlobe to the center of your shoulder. A distance greater than about one inch forward suggests meaningful forward displacement.
Recording your baseline:
- Take a side-profile photo weekly, same time of day, same wall or doorframe for consistency
- Note your wall-test result (head touches easily / touches with effort / cannot touch)
- Keep a brief symptom log: rate neck stiffness, headache frequency, and upper-back tension on a 1–10 scale
- Retest formally at 4 weeks and 8 weeks; most people see measurable change in that window with consistent work
A postural assessment guide can walk you through a more detailed evaluation if the quick check leaves you uncertain.
Why forward head posture develops and which muscles to target
FHP is defined as the head sitting forward of the shoulders in the sagittal plane, typically measured as the horizontal distance between the ear canal and the center of the shoulder joint. The informal label “tech neck” captures the most common driver: sustained forward flexion during phone use, laptop work, and desk sitting.
The muscle imbalance behind it follows a predictable pattern. On one side, the deep cervical flexors (longus colli, longus capitis) and the mid and lower trapezius and rhomboids become weak and inhibited from underuse. On the other side, the pectorals, upper trapezius, and suboccipital muscles at the base of the skull become tight and overactive from chronic shortening. The result is a forward pull that the weakened posterior muscles can no longer resist.
Physical therapists emphasize that this is why stretching alone often fails: the posterior neck muscles are already chronically overstretched and weak. Adding more stretching to an already-lengthened muscle does not restore its ability to hold your head up. What those muscles need is activation and load.
The practical implication is straightforward. Prioritize chin tucks and upper-back strengthening over neck stretches. Stretching the pecs and suboccipitals is still useful, but it is the activation work that drives lasting change. The NASM corrective exercise continuum formalizes this logic into a four-phase sequence: inhibit the overactive tissues, lengthen them, activate the underactive ones, then integrate everything into functional movement.
Your phased forward head posture workout: step-by-step program
This program follows the inhibit → lengthen → activate → integrate sequence. Work through all four phases each session during weeks 1–2, then shift emphasis toward activation and integration as mobility improves.
Phase 1: Inhibit (self-myofascial release, 2–3 minutes)
Suboccipital release: Place two tennis balls in a sock, lie on your back, and position the balls at the base of your skull. Rest there for 60–90 seconds. You are not rolling; you are letting gravity do the work. This reduces tone in the tight suboccipital muscles before you stretch them.
Phase 2: Lengthen (targeted stretches, 5–6 minutes)
Doorway pec stretch: Stand in a doorframe, forearms on the frame at 90 degrees, step one foot forward, and lean gently through the door until you feel a stretch across the chest. Hold 30 seconds each side. Keep your chin tucked slightly so you are not extending the neck to compensate.
Upper trap stretch: Sit tall, drop your right ear toward your right shoulder, and gently place your right hand on the side of your head for a light overpressure. Hold 20–30 seconds per side.
Phase 3: Activate (deep neck flexor work, 8–10 minutes)
Chin tuck (seated or standing): Sit or stand tall. Without looking down, slide your head straight back as if making a double chin. Hold 2–4 seconds, release slowly. This is not a nod; the movement is purely horizontal. Do 10 reps. Common mistake: people tilt the chin down instead of retracting the head back. The motion should feel like you are pulling your skull away from a wall behind you.
Supine chin tuck and curl: Lie on your back with knees bent. Perform a chin tuck, then slowly lift your head about one inch off the floor. Hold 3–5 seconds, lower with control. This adds load to the deep flexors without straining the neck. Start with 1 set of 8–10 reps; progress to 2 sets of 12–15 reps over 3–4 weeks.
Mass General Brigham recommends 2–3 sets of approximately 10 repetitions daily for chin tucks to strengthen the stabilizing muscles that tech-neck behaviors weaken.
Phase 4: Strengthen and integrate (8–10 minutes)
Wall Angels: Stand with your back flat against a wall, feet a few inches out. Press your lower back, upper back, and head against the wall. Raise your arms to a goalpost position (elbows at 90 degrees, backs of hands on the wall). Slowly slide your arms overhead, keeping everything in contact with the wall. Return. Do 10 reps, 2–3 sets. If your head cannot touch the wall, place a small rolled towel behind it.

Prone Y-T-I: Lie face down on the floor, arms extended. Lift into a Y shape (thumbs up), hold 2 seconds, lower. Repeat in a T shape, then an I shape (arms overhead). That is one round. Do 10 reps per position, 2 sets. This activates the lower trapezius and rhomboids directly.
Resistance band rows: Anchor a light band at chest height. Stand tall, chin tucked, and pull the band toward your lower ribs, squeezing your shoulder blades together at the end range. Hold 1–2 seconds. Do 2–3 sets of 10–12 reps. Keep your neck long throughout; do not let your chin jut forward as you pull.
Pro Tip: “Adult tummy time” — lying prone on your elbows for 2–3 minutes — is one of the most efficient integration moves available. It restores thoracic extension and activates the entire posterior chain without any equipment. UPMC HealthBeat recommends it as a practical daily reset.
Sets, reps, and progression at a glance
| Exercise | Starting sets/reps | Frequency | Progression cue |
|---|---|---|---|
| Chin tuck | 1–2 sets × 10 reps, 2–4 sec hold | Multiple times daily | Add 2 reps per week; progress to banded version |
| Supine chin tuck and curl | 1 set × 8–10 reps | Daily | Progress to 2 sets × 12–15 reps by week 4 |
| Doorway pec stretch | 2–3 × 30 sec per side | Daily | Increase lean depth as range improves |
| Wall Angels | 2 sets × 10 reps | 3× per week | Add light resistance band across forearms |
| Prone Y-T-I | 2 sets × 10 reps per position | 3× per week | Add light wrist weights at week 4–6 |
| Resistance band rows | 2 sets × 10–12 reps | 3× per week | Increase band resistance every 2–3 weeks |
| Adult tummy time | 2–3 minutes | Daily | Extend to 5 minutes; progress to plank on ball |
Sample 6-week weekly plan
Weeks 1–2: All four phases every session. Sessions 3–4 days per week. Micro-dose chin tucks every 1–2 hours during the workday. Change position every 20 minutes.
Weeks 3–4: Reduce Phase 1–2 to 2 days per week (maintenance). Increase Phase 3–4 to 4 days per week. Add banded chin tucks. Continue micro-dosing.
Weeks 5–6: Phase 3–4 four days per week. Introduce light wrist weights for prone Y-T-I. Begin integrating scapular retraction cues into daily activities (standing in line, walking). Retest with wall test and side-profile photo.
The NASM corrective exercise guide recommends isometric holds of 2–4 seconds and gradual progressions to 10–15 reps across 1–2 sets, 3–5 days per week, which aligns directly with this schedule.
How long does it take to see real improvement?
Most people notice reduced neck stiffness and tension headaches within one to two weeks of consistent micro-dosing. That early relief comes from reduced muscle guarding, not structural change. Measurable postural improvement, where your wall test and side-profile photos show a real shift, typically takes 6–12 weeks of consistent work.
The research signal here is clear: exercise-based programs for cervical posture show meaningful improvements in neck-related outcomes across multiple study designs, though effect sizes vary depending on severity, consistency, and whether ergonomic changes accompany the exercises. Starting earlier and pairing movement with workstation adjustments consistently produces better results than exercises alone.
Several factors shape how quickly you progress:
Age and tissue adaptability: Younger adults tend to see faster structural change. Older adults still improve, but the timeline often extends toward the 12-week end.
Duration of FHP: A posture you have held for two years takes longer to retrain than one that developed over two months. Chronic patterns involve motor learning, not just muscle tightness.
Daily ergonomics: If your monitor sits below eye level and you spend eight hours a day in forward flexion, exercises fight an uphill battle. Raising your screen to eye level removes the primary loading stimulus.
Consistency of micro-dosing: Yale Medicine notes that the best posture is a moving posture, and recommends changing position roughly every 20 minutes. Hourly chin tucks and frequent position changes compound over a workday in a way that three weekly gym sessions cannot replicate.
Once your posture improves, maintenance is straightforward: continue upper-back strengthening 2–3 times per week, keep micro-dosing chin tucks, and revisit your ergonomics setup every few months as your work environment changes.
When should you stop exercising and see a clinician?
Home-based cervical posture exercises are safe for most people with typical FHP and tech-neck symptoms. Stop and seek evaluation if you notice any of the following:
- Radiating pain down one or both arms, especially if it follows a specific nerve distribution (e.g., into the thumb, index finger, or pinky)
- Numbness or tingling in the hands or fingers that is new, worsening, or does not resolve with position changes
- Progressive weakness in the arms or hands (dropping objects, difficulty gripping)
- Loss of bowel or bladder control — this is a medical emergency; go to an emergency room
- Sudden severe neck pain after a fall or trauma, even if it feels manageable
- Symptoms that worsen consistently after exercises rather than improving over 2–3 weeks
The AMA and Yale Medicine both advise consulting a primary care clinician if pain radiating down the arms, numbness, or tingling persists after several weeks of conservative care, to rule out nerve impingement or disc involvement.
When you see a clinician, bring your baseline photos, symptom log, and a note of which exercises provoke symptoms. A physiotherapist will typically perform a postural exam, a neurological screen, and design a targeted program. Knowing your baseline makes that appointment far more productive. For a deeper look at what clinical care involves, the physiotherapy guide on Bestforwardheadposturefix covers what to expect from a professional evaluation.
What clinicians actually say about fixing tech neck
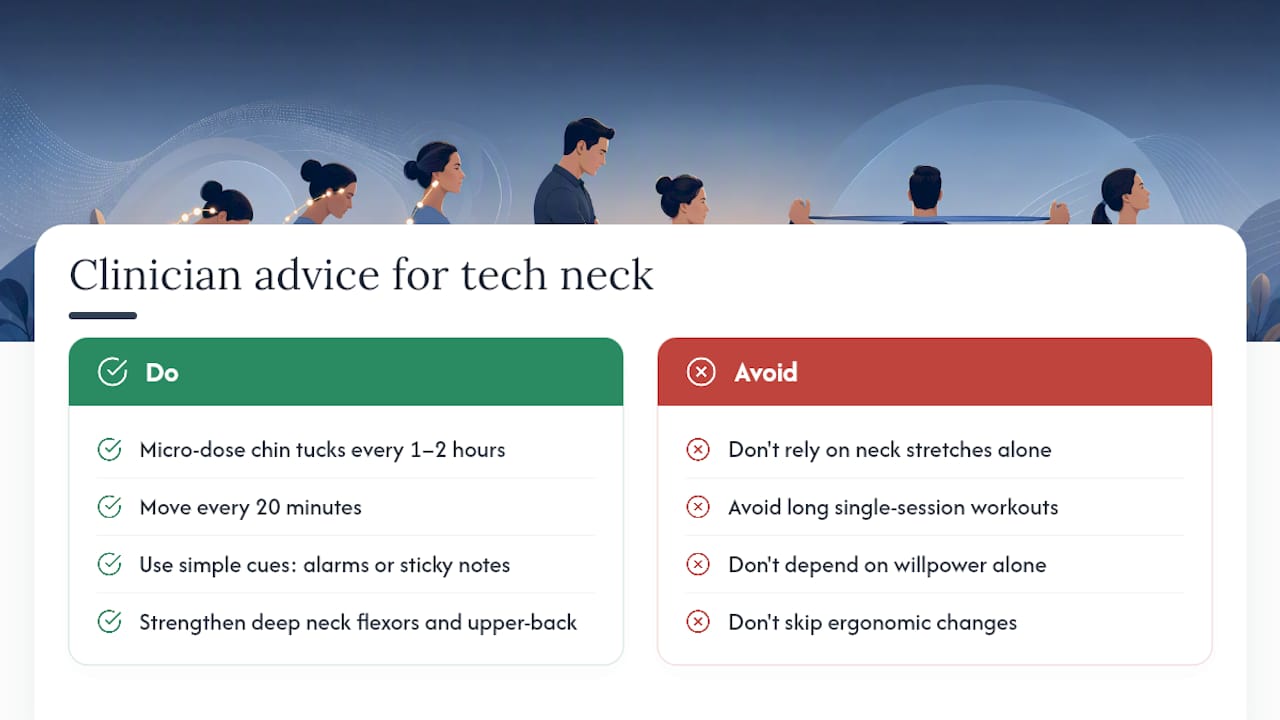
The most persistent myth in the tech-neck space is that stretching fixes it. Physical therapists are consistent on this point: posterior neck muscles in chronic FHP are already overstretched and inhibited. Stretching them further does not restore their function. Popular Science reported a physical therapist’s perspective that upper-back activation and deep neck flexor strengthening are the essential interventions, not neck stretches.
The clinical consensus is worth stating plainly: you cannot stretch your way out of a weakness problem. The muscles holding your head up need load, not length.
A few adherence principles that clinicians return to repeatedly:
Micro-dose, don’t marathon: Brief sets of chin tucks every 1–2 hours build deep neck flexor endurance more effectively than one long session. The nervous system responds to frequency of stimulus, not just total volume.
Move every 20 minutes: Yale Medicine frames this as the single most effective prevention strategy. A 30-second position change, a chin tuck, or even standing up resets the cumulative load on the cervical spine.
Use simple environmental cues: A sticky note on your monitor, a phone alarm, or a browser extension that prompts you to sit back every 20 minutes removes the cognitive load of remembering. Adherence drops sharply when it depends on willpower alone.
Prone work is underused: “Adult tummy time” and prone Y-T-I are efficient because they load the posterior chain in spinal extension, the exact position that hours of desk work suppress. UPMC HealthBeat recommends prone positioning as a practical daily reset for thoracic extension.
Peer-reviewed literature on cervical rehabilitation, available through NCBI PMC, supports exercise-based programs for neck posture and pain outcomes across multiple study designs, though effect sizes vary. The consistent thread across studies is that programs combining activation, strengthening, and ergonomic change outperform single-modality approaches.
Why Bestforwardheadposturefix recommends this phased approach
The case for exercise-first is not ideological. It is mechanical. The cervical spine is a load-bearing structure that responds to training the same way any other part of the body does. Passive treatments, whether a massage, a posture brace, or a new pillow, address the symptom of the moment. They do not retrain the motor patterns that created the problem.
What I find most underappreciated in the popular coverage of tech neck is the role of the thoracic spine. Most people focus entirely on the neck, but the forward head is often a downstream consequence of thoracic kyphosis, the rounded upper back that develops from years of sitting. Exercises that address only the cervical spine while ignoring thoracic extension are solving half the problem. Prone Y-T-I, Wall Angels, and adult tummy time work precisely because they address both.
Bestforwardheadposturefix is built around this fuller picture: structured education, phased exercise programs, ergonomic guidance, and sleep-position advice that supports alignment overnight. The sleep position guide and the posture correction techniques overview are worth reading alongside this program, because what you do for the other 16 hours of the day shapes how fast the exercises work.
Sources
The sources below are the primary clinical and peer-reviewed references behind this guide.
- How to Fix Forward Head Posture Guide
- Yale Medicine
- Prevent Tech Neck | Mass General Brigham
- Tech neck | Cleveland Clinic
- Ncbi
This article is general information, not a substitute for advice from a qualified doctor. Consult a qualified healthcare professional about your own circumstances before acting on anything here.