Chin tucks—also called craniocervical flexion—are one of the simplest ways to wake up the deep neck flexors that support your head and cervical spine.
Done well, they can reduce neck discomfort, improve head-neck alignment, and make other rehab drills work better.
This guide by BestForwardHeadPostureFix shows you exactly how to integrate chin tucks into a complete, safe rehabilitation routine—step by step, with practical dosage ideas rooted in common clinical practice.
You shall learn the technique, progressions, weekly scheduling, and how to blend chin tucks with mobility and strengthening so the gains actually “stick.”
You will also see simple cues (think “make a soft double chin”) that improve form and reduce compensation from the big surface muscles.
Finally, you will get easy ways to use chin tucks during daily activities—typing, driving, and phone use—so you accumulate quality reps without carving out extra gym time.
Let’s build your plan.
Points Covered in this Article
- Why chin tucks belong in rehab
- The exact technique: setup, movement, cues
- Starter prescription (first 2 weeks)
- Progressions (weeks 3–8): holds, head-lift, gravity, and load
- Weekly schedule and how to stack with other exercises
- Quality control: tests, feedback, and form checks
- Integrating chin tucks into daily life
- Safety notes and when to modify
- Troubleshooting plateaus
- FAQ: Integrating Chin Tucks into a Rehabilitation Routine
- Putting it all together: a sample 8-week plan
Why Chin Tucks belong in Rehab?
Many people with neck pain under-recruit the deep cervical flexors (longus capitis and longus colli) while overusing the superficial muscles at the front and sides of the neck. Chin tucks target those deep stabilizers with a small, precise “nodding” action.
This helps restore motor control, improves endurance of the right tissues, and complements broader postural work. When chin tucks are progressed deliberately and practiced consistently, they tend to reduce symptoms and make everyday positions—like computer work—feel less taxing.
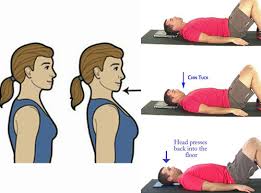
The Exact Technique: Setup, Movement, Cues
Position: Start supine (on your back) with knees bent. If needed, place a very thin towel under your head so your face points straight up.
Movement: Imagine the tiniest “yes” nod. Slide the back of your head long as you draw the chin straight backward, lengthening the back of your neck. Avoid poking the chin up or lifting the head. Think “tall through the crown.”
Cues that help:
- “Make a soft double-chin.”
- “Close the top drawer of a filing cabinet with your chin.”
- “Lengthen the back of your neck.”
- “Don’t squash the peach under your chin.”
Breathing: Slow, relaxed nasal breathing. Keep the teeth unclenched; tongue rests on the roof of the mouth.
Rep/Hold basics (technique phase): Hold the gentle tuck for 5–10 seconds, relax fully, and repeat for 5–10 reps. Move smoothly; no jerks or straining.
Starter Prescription (first 2 weeks)
Frequency: 1–2 sessions per day, plus brief “micro-sets” sprinkled into daily life.
Dosage: 5–10 reps × 5–10-second holds, resting as needed. The goal is pristine form, not fatigue.
Quality focus: You should feel a mild effort deep in the front of your neck, not a strong pull from the big surface flexors or a jaw clench. If your chin juts forward, your shoulders lift, or the front of your neck cramps, reset and go smaller.
Optional feedback tool: If you own a pressure cuff used for neck training, place it under the neck and inflate to a baseline (often ~20–22 mmHg). “Nod” to gently increase pressure in small steps. This gives objective feedback and discourages substitution.
Progressions (weeks 3–8): Holds, Head-Lift, Gravity, and Load
Progress only when every rep looks and feels clean.
- Longer holds (endurance control)
Build from 5–10 seconds toward 20–30 seconds while keeping the movement tiny and the jaw relaxed. Aim for smooth breathing throughout. - Chin tuck with head lift
Hold a gentle tuck, then barely lift the head 2–3 cm for 3–5 seconds before lowering with control. Start with 5 reps; over time, reach 8–10 reps and slightly longer holds. Keep the tuck; don’t let the chin poke. - Change body position
- Seated/standing tucks: Practice against gravity with a tall spine: 5–10-second holds × 10 reps.
- Quadruped (all-fours): Keep the spine neutral; gently tuck and hold 5 seconds × 8–10 reps. This adds a postural challenge and integrates the shoulder girdle.
- Tuck-and-move (gentle range work)
Maintain a light tuck while you slowly look slightly up or down within a comfortable range: 5–10 reps each direction. The tuck anchors the neck while you explore motion.
Weekly Schedule and How to Stack with other Exercises
Chin tucks shine when paired with light thoracic mobility and mid-back endurance so your upper body can support a neutral head position.
Days 1–3 (motor control emphasis)
- Supine chin tucks: 2 sets of 8–10 reps × 5–10-second holds
- Chin tuck with head lift (if form is rock-solid): 1 set of 5 reps × 3–5 seconds
- Gentle thoracic extensions over a towel and easy scapular setting
Days 4–6 (progressive challenge)
- Seated/standing chin tucks: 2–3 sets of 10 reps × 5–10-second holds
- Tuck-and-move (flexion/extension): 1–2 sets of 5–10 reps each direction
- Optional light rows or band pull-aparts for mid-back endurance
Day 7 (recovery)
- One light set of chin tucks (optional) and mobility only; focus on effortless quality
Quality Control: Tests, Feedback, and Form Checks
- Self-check with a mirror or fingertips
Watch that the chin glides back rather than up. Lightly rest your fingertips on the big front neck muscles: if they jump, shrink your motion and re-cue. - Fatigue and substitution signs
Shaking, jaw clenching, or upper-trap tension means you have gone too hard. Reduce hold time or reps. - Sensation and pacing
A mild, dull effort is normal. Sharp pain or radiating symptoms are not—stop and regress. Keep breathing slow and even; never hold your breath to “win” a longer hold. - Simple baseline
Note a few everyday positions (e.g., 30 minutes at the laptop, driving) and rate comfort weekly. As control and endurance improve, those ratings should trend up even before strength numbers do.

Integrating Chin Tucks into Daily Life
The secret is “little and often.” Couple micro-sets with routines so they actually happen:
- At the computer: each hour, 5 reps × 5-second holds while you sit tall.
- Phone use: before unlocking, do 3 gentle tucks.
- Driving or standing in queues: 3–5 micro-reps to reset posture.
- Work sprints: at the end of an email draft or coding block, perform a 20-second easy tuck.
- Walk breaks: every time you stop at a crosswalk or elevator, practice one small, luxurious tuck.
These micro-doses stack high-quality practice without fatigue and teach your neck to “find” a better position in the wild.
Safety Notes and when to Modify
- Acute flare-ups: Start supine with ultra-short holds (3–5 seconds) and fewer reps.
- Headache-prone: Keep intensity low, nail the tiny nod, and progress slowly.
- Nerve-like symptoms (numbness, tingling, radiating arm pain): Stop and seek professional input.
- TMJ irritation: Keep teeth apart, tongue on the palate, and use smaller nods.
- Dizziness: Move smaller and slower. If symptoms persist, get assessed before continuing.
Troubleshooting Plateaus
- “I can’t feel the deep flexors.” Regress to tiny nods in supine. Add fingertip feedback just under the chin. Try exhaling gently as you begin the nod.
- “My front neck cramps.” Reduce holds to 3–5 seconds, perform fewer total reps, and increase rest.
- “Form collapses when I’m upright.” Break sets into mini-clusters: 2–3 reps at a time, then pause. Do more clusters through the day instead of one big set.
- “No change after 3–4 weeks.” Audit technique, rein in range, and add basic mid-back endurance (e.g., band rows). Often the missing piece is postural support, not more neck effort.
Putting it all Together: a Sample 8-Week Plan
Weeks 1–2 (Learn it)
- Supine chin tucks: 2 × 8–10 reps × 5–10-second holds
- Micro-sets: 3–5 reps, 3–5 times/day (work breaks)
- Goal: fluent, pain-free motion without jaw or big-muscle dominance
Weeks 3–4 (Endurance)
- Supine tucks: holds to 10–20 seconds; total time under tension ~2–3 minutes/session
- Add chin tuck with head lift: 1–2 × 5 reps × 3–5-second holds, immaculate form
- Begin seated tucks: 1–2 × 10 reps × 5 seconds
Weeks 5–6 (Function)
- Seated/standing tucks: 2–3 × 10 reps × 5–10-second holds
- Tuck-and-move (gentle flex/extend): 1–2 × 5–10 reps each; several micro-sets/day
- Complement with light rows or band pull-aparts
Weeks 7–8 (Resilience)
- Maintain daily micro-sets (3–5 reps, 3–5 times/day)
- Choose one challenge: quadruped tucks (8–10 reps) or longer holds (20–30 seconds) if technique stays crisp
- Re-test comfort in the everyday positions you logged at baseline
FAQ: Integrating Chin Tucks into a Rehabilitation Routine
Q-1: How to add chin tuck exercises to a neck rehabilitation routine?
A-1: Chin tuck exercises can be added early in a neck rehabilitation routine because they are gentle and target the deep neck flexor muscles. Start by sitting or standing with your spine upright and shoulders relaxed.
Slowly draw your chin straight back, creating a “double chin” without tilting your head downward. Hold the position for 5–10 seconds and repeat 8–10 times. Most therapists recommend performing this movement at the beginning of the routine to activate stabilizing muscles before moving on to stretching or strengthening exercises.
Over time, chin tucks help improve cervical alignment and reduce strain on surrounding muscles.
Q-2: What is the best way to include chin tucks in a physical therapy program for neck pain?
A-2: The best approach is to combine chin tucks with other therapeutic movements such as shoulder blade squeezes, neck stretches, and upper back strengthening exercises.
Physical therapists often use chin tucks as a foundational movement that prepares the neck for more advanced rehabilitation activities. Performing the exercise slowly and with proper posture is essential.
Patients should focus on maintaining a neutral spine and avoid pushing the head forward after the movement. Regular practice helps reduce muscle tension and promotes better posture during daily activities.
Q-3: What is a step-by-step guide to integrating chin tucks into posture correction exercises?
A-3: Begin by sitting upright with your feet flat on the floor and shoulders relaxed. Step one is to gently pull your chin straight back while keeping your eyes forward. Step two is to hold the position for several seconds without straining your neck muscles.
Step three is to slowly release the movement and return to the starting position. Repeat the exercise in controlled sets. Once comfortable, chin tucks can be combined with wall posture drills or resistance band exercises to enhance posture correction.
Q-4: How often should chin tucks be done during cervical spine rehabilitation?
A-4: Frequency depends on the severity of symptoms and the guidance of a healthcare professional. In many rehabilitation programs, chin tucks are performed two to three times per day with sets of 8–12 repetitions. Consistency is more important than intensity. Performing the movement regularly helps retrain neck muscles and encourages proper head alignment throughout the day.
Q-5: Can chin tuck exercises be combined with other neck strengthening exercises?
A-5: Yes, chin tucks are often combined with complementary exercises that target the upper back and shoulder stabilizers. Movements such as scapular retractions, resistance band rows, and gentle neck stretches work well alongside chin tucks.
This combination helps create balanced muscle support for the cervical spine. By strengthening multiple muscle groups, rehabilitation programs become more effective at reducing pain and improving posture.
Q-6: How to perform chin tucks correctly in a daily rehabilitation routine?
A-6: Correct technique is essential for safe and effective results. Keep your head level and avoid tilting your chin downward. The movement should be subtle and controlled, focusing on drawing the chin backward rather than forcing the neck into an exaggerated position. Breathing normally during the exercise also helps prevent unnecessary tension.
Q-7: What is a physical therapy routine with chin tucks for forward head posture?
A-7: A typical routine may begin with chin tucks to activate deep neck muscles, followed by chest stretches and upper-back strengthening exercises. This sequence addresses the muscular imbalances that contribute to forward head posture. Regular practice gradually improves spinal alignment and reduces the strain placed on neck structures.
Q-8: What are beginner rehabilitation exercises that include chin tuck movements?
A-8: Beginners can start with simple seated chin tucks, wall-supported chin tucks, or chin tucks performed while lying on the floor. These variations reduce strain while helping individuals learn the correct movement pattern. As strength improves, the exercise can be integrated with light resistance training or posture drills.
Q-9: How to structure a rehab workout plan using chin tuck exercises?
A-9: A structured plan usually begins with warm-up movements, followed by chin tucks as a muscle-activation exercise. Afterward, strengthening and mobility exercises for the neck, shoulders, and upper back can be added. Ending the session with gentle stretches helps maintain flexibility and relaxation.
Q-10: When should chin tucks be used in a neck injury recovery program?
A-10: Chin tucks are typically introduced during the early stages of recovery when gentle stabilization exercises are recommended. They help rebuild neck strength without placing excessive stress on injured tissues. However, individuals recovering from serious injuries should perform them only under professional guidance to ensure safety and proper progression.
Takeaway
Chin tucks earn their spot in rehab because they target the right muscles with the right strategy—motor control first, endurance next, then real-life carryover.
Keep the movement small, the jaw soft, and the neck long, and you will feel the deep flexors doing quiet, steady work.
Progress patiently: master the gentle nod, add brief head lifts, then take the skill upright and into motion.
Sprinkle micro-sets into your day so practice happens automatically, not just on the mat.
Pair the drill with easy thoracic mobility and mid-back endurance for durable posture support.
If symptoms flare or form wobbles, regress, rebuild, and keep your focus on quality over quantity.
With this plan, chin tucks become a reliable anchor for your rehabilitation routine—simple, precise, and surprisingly powerful.
References: