Cervical lordosis exercises can genuinely relieve neck pain and improve posture within weeks, but restoring the actual bony curve on an X-ray is a taller order for exercise alone. Chin tucks, retraction drills, and isometric holds retrain the muscles that hold your head up and often reduce stiffness and headaches fast. Bigger structural gains, the kind measured in degrees on imaging, tend to require a multimodal program that adds extension traction, stop and see a clinician if you notice arm numbness, weakness, or worsening pain.
TL;DR:
- Exercises like chin tucks and isometric holds can improve neck symptoms within 6 to 12 weeks, but significantly restoring the cervical curve may require multimodal treatment.
- A 12 to 18 degree increase in curvature is achievable through extension traction over 5 to 15 weeks, with improvements lasting up to 1.5 years.
- Progress can be easily monitored by biweekly photos, weekly range of motion tests, and symptom logs to track improvements without repeated X-rays.
- Persistent or worsening symptoms, especially with neurological signs, should prompt immediate clinical evaluation before continuing exercise routines.
- Consistent habit formation and ergonomics often outweigh intensity, and skipping traction limits the chances of measurable radiographic curve correction.
Table of Contents
- What Loss of Cervical Lordosis Actually Means
- What to Check Before Starting a Neck Posture Routine
- The Core Exercises That Rebuild Neck Curve
- How Much Change Can You Actually Expect?
- What the Research Actually Shows
- How to Track Whether Your Neck Curve Is Improving
- A Realistic Take on Fixing Your Neck Curve
- Ready for a Structured Program Instead of Guesswork Exercises?
- Sources
What Loss of Cervical Lordosis Actually Means
The cervical spine is supposed to curve gently backward, like a shallow “C” when viewed from the side. That curve, called cervical lordosis, absorbs shock and keeps your head balanced over your shoulders instead of pulling on your neck muscles all day. When that curve flattens or reverses into a slight forward bend, clinicians describe it as loss of lordosis or, in more advanced cases, cervical kyphosis.
Several things push the neck toward this flattened shape:
- Forward head posture from hours spent looking at phones and screens, which drags the head ahead of the shoulders and straightens the curve over time
- Trauma, especially whiplash from car accidents, which can disrupt the ligaments and discs that maintain the curve
- Degenerative changes, including disc thinning and osteoarthritis, which reduce the spine’s natural spacing
- Muscle imbalance, where tight chest and upper trap muscles overpower weak deep neck flexors and lower traps
Common symptoms include neck stiffness, dull aching between the shoulder blades, tension headaches, and a visible forward head. Red flags that go beyond a posture problem include numbness or tingling running down an arm, hand weakness, dizziness with neck movement, or pain that keeps worsening despite rest. Those warrant an evaluation before you start any exercise routine, not after.
What to Check Before Starting a Neck Posture Routine
Cervical lordosis exercises are low risk for most people, but “low risk” isn’t the same as “no risk.” A few minutes of screening now can save you weeks of setback later.
Stop immediately and contact a clinician if you experience any of the following during or after exercise:
- Sharp or shooting pain down an arm
- New numbness, tingling, or weakness in the hands
- Dizziness, blurred vision, or ringing in the ears with neck movement
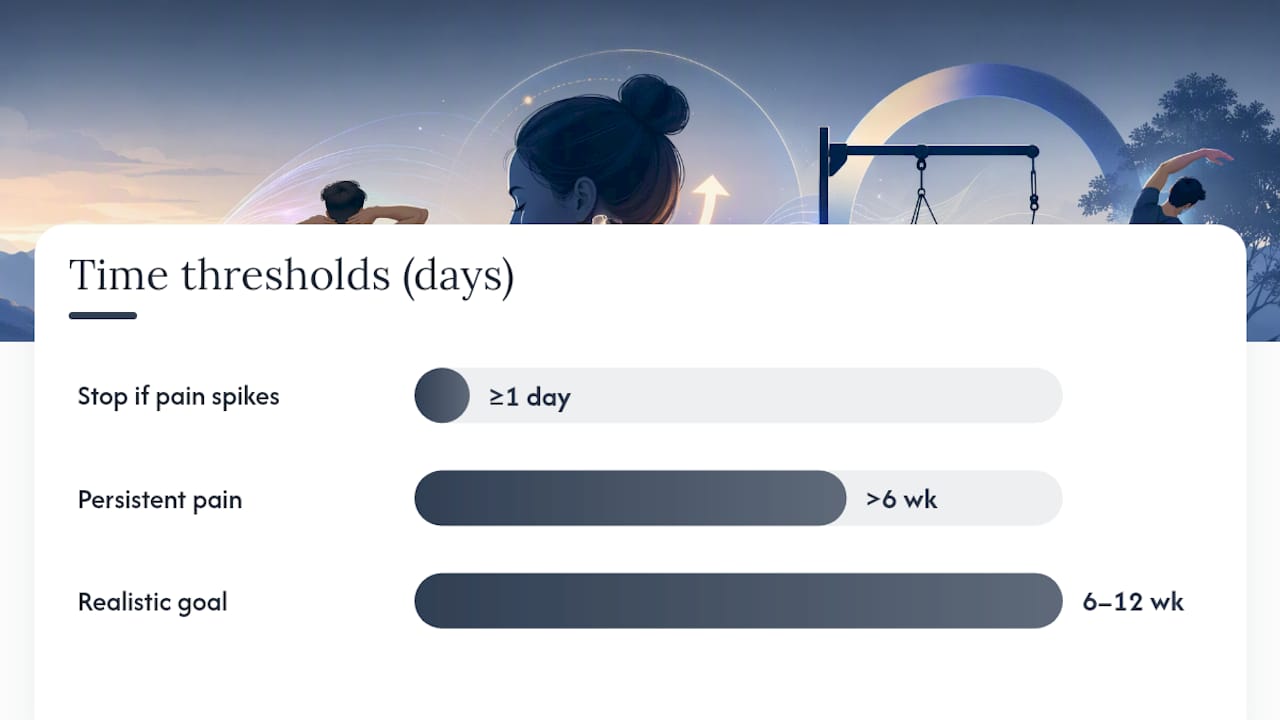
- Pain that spikes and stays elevated for more than a day after a session
Imaging or a hands-on clinician assessment makes sense if your symptoms started after a trauma, if you’ve had persistent pain for more than six weeks without improvement, or if any red flag above shows up. Harvard Health’s guidance on easing neck pain backs exercise and posture correction as sensible first-line steps for uncomplicated neck pain, which covers most people reading this.
Set expectations before you begin. A realistic 6 to 12 week goal is less daily stiffness, fewer tension headaches, a noticeably more level chin in photos, and slightly better range of motion. That’s a strong outcome and worth working toward on its own.
Pro Tip: Take a plain, well-lit side photo of your posture on day one. You’ll forget what “before” looked like within two weeks, and that photo becomes your best motivation on the days progress feels invisible.
The Core Exercises That Rebuild Neck Curve
This is the working part of the program. Each exercise targets a different piece of the puzzle: the deep flexors that support the curve, the muscles that pull the head back over the shoulders, and the thoracic spine that either helps or sabotages everything above it.
-
Cervical retraction (chin tuck). Sit tall, look straight ahead, and glide your chin straight back as if making a double chin, without tipping your head up or down. Hold 3 to 5 seconds, release, and repeat 10 times. Do 3 sets daily. This is the foundation move, and almost every other exercise below builds on it.
-
Modified cervical and shoulder retraction protocol. A study on patients with loss of cervical lordosis and neck pain used a two-part sequence: retraction combined with a gentle head lift, held for 3 seconds, followed by shoulder retraction paired with slight neck extension, held for 10 seconds. Patients repeated this combination multiple times throughout the day and showed meaningful gains in cervical alignment and pain reduction after 6 to 8 weeks. Start with 10 repetitions, three times a day, and treat it as your primary daily habit rather than a once-a-day workout.
-
Cervical extension progressions. Begin with active extension in mid-air, gently tilting your head back within a pain-free range, 10 reps for 2 sets. Once that feels easy and pain-free over one to two weeks, progress to light resistance band work at the top of the range, where a partial band pull adds controlled load to the extensor muscles. Keep resistance light. This is a strengthening exercise, not a stretch to force through discomfort.
-
Isometric neck holds. Place your palm against your forehead and gently push your head into your hand without letting it move, holding 5 seconds per direction (forward, backward, each side). Do 5 holds per direction, once daily. Isometrics build stability without loading the joints through a range of motion, which makes them a safe entry point if extension movements feel irritating at first.
-
Thoracic extension. Sit or lie back over a rolled towel placed between your shoulder blades and gently arch backward over it for 20 to 30 seconds, 3 to 5 rounds. A stiff upper back forces the neck to compensate, so this move matters more than most people assume, even though it targets a joint several inches below the actual problem.
-
Scapular retraction and strengthening. Squeeze your shoulder blades together and slightly down, holding 5 seconds, for 10 to 15 reps, 2 sets daily. Add light resistance band rows once bodyweight reps feel easy.
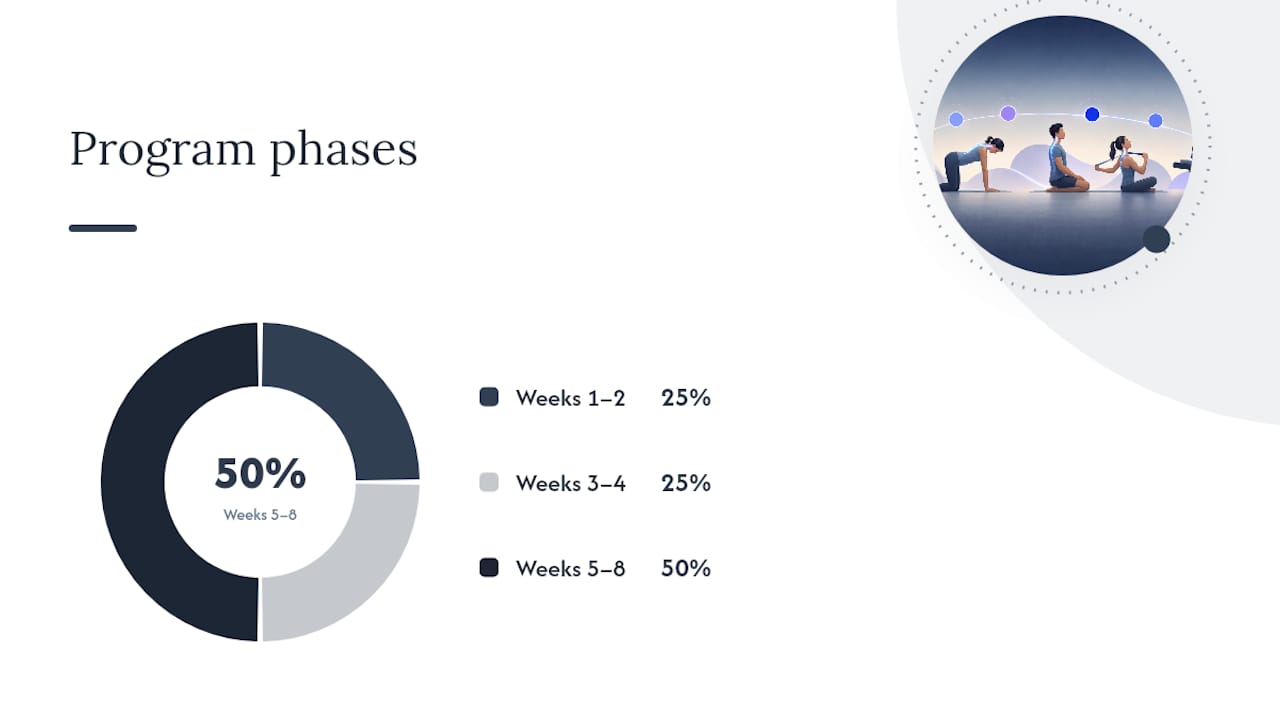
Sample 6 to 8 week plan: Weeks 1 to 2, focus on retraction and isometrics daily to build the movement pattern. Weeks 3 to 4, add thoracic extension and scapular work, keeping frequency at once or twice daily. Weeks 5 to 8, introduce the resistance band extension progression and increase the modified retraction protocol to its full frequency throughout the day. For a shorter daily add-on once the basics feel automatic, a 3-minute daily alignment routine can reinforce the habit without demanding a full workout block.
Pro Tip: Anchor these exercises to something you already do, like brushing your teeth or waiting for coffee to brew. Consistency beats intensity here by a wide margin.
How Much Change Can You Actually Expect?
Exercise alone reliably improves symptoms. Restoring the measured curve on an X-ray is a different question, and the evidence draws a fairly sharp line between the two.
Programs built entirely around retraction, isometrics, and postural strengthening tend to produce noticeable pain relief and functional improvement within 4 to 8 weeks. Patients in the modified retraction study saw significant alignment and pain improvements over that timeframe. What these programs don’t reliably do is produce large, lasting changes in the radiographic angle of the cervical curve, especially once a flattening has been present for years.
That’s where multimodal programs enter the picture. A systematic review of controlled trials on cervical extension traction found that programs combining traction with exercise increased measured lordosis by roughly 12 to 18 degrees over 5 to 15 weeks, with improvements holding up at follow-up as long as 1.5 years. Groups that skipped traction and relied on conventional exercise alone tended to regress within months of stopping treatment.
A few decision rules worth keeping:
- If pain and stiffness are improving through weeks 6 to 8, keep going. It’s working.
- If you’ve seen no meaningful change by 8 to 12 weeks of consistent exercise, that’s a reasonable point to ask a clinician about adding a structured extension-traction program.
- Any neurologic sign (numbness, weakness, radiating pain) means escalate immediately, not at the 8 week mark.
The traction-versus-exercise-alone gap of roughly 12 to 18 degrees is the single most useful number in this entire topic. It’s the difference between a program that manages symptoms and one aimed at measurably changing the shape of your spine.
What the Research Actually Shows
The evidence here isn’t uniform, and it’s worth being honest about where it’s strong and where it’s thinner. Extension traction has the most robust backing; home exercise programs have solid but more modest support.
The strongest data point comes from a systematic review of controlled trials on extension traction, which found consistent lordosis gains in the 12 to 18 degree range across studies using 5 to 15 week protocols, with maintained improvement up to a year and a half later. A separate randomized trial with two-year follow-up found that adding cervical extension traction to conventional exercise produced greater and more durable improvements in both nerve root function and pain compared to exercise alone, with benefits still measurable at the two-year mark.
On the exercise side, the modified cervical and shoulder retraction study is the most directly applicable piece of evidence for a home program, since it tested a specific, repeatable protocol rather than a generic “do neck exercises” recommendation. A separate review of Chiropractic BioPhysics® case reports found an average 14 degree lordosis improvement and a 12 millimeter reduction in forward head translation after around 40 treatments over 16 weeks, with many cases maintaining gains through periodic follow-up visits.
The consistent thread across this research isn’t that exercise fails. It’s that exercise builds the muscular support and habit changes a corrected curve needs to hold, while traction supplies the mechanical force to actually reshape the curve. Neither piece does the other’s job well on its own.
- Extension traction trials: 12 to 18 degree average gains, maintained up to 1.5 years
- Modified retraction exercise study: significant pain and alignment gains at 6 to 8 weeks
- CBP case report review: 14 degree average gain after roughly 40 sessions over 16 weeks
How to Track Whether Your Neck Curve Is Improving
You don’t need repeat X-rays every few weeks to know if a program is working. Simple, consistent checks catch most of the signal.
- Take a lateral photo every two weeks, same spot, same lighting, standing naturally. Drop a plumb line (a string with a weight, or a straight vertical edge in the photo) from your ear canal down. In good alignment, that line should pass close to the shoulder, not several inches in front of it.
- Check range of motion weekly. Note how far you can turn your head each direction and how far you can look up without pain. Small, steady gains in degrees of rotation matter more than any single day’s snapshot.
- Keep a short symptom log. Rate morning stiffness and headache frequency on a simple 1 to 10 scale, a few times a week. Trends over a month tell you far more than how you feel on any one day. A structured alignment self-assessment can help standardize how you measure this at home.
- Request imaging only when it changes the plan. If symptoms plateau by week 10 to 12 despite consistent exercise, or if red-flag signs appear, that’s when a clinician-ordered X-ray or referral earns its cost. Imaging for its own sake, absent a decision it will change, isn’t worth the radiation exposure or the expense.
A Realistic Take on Fixing Your Neck Curve
Most people chasing “cervical lordosis exercises” online want a number: how many degrees, how many weeks. I understand the instinct, but it misses what actually drives results. The habit matters more than any single exercise. Someone doing modest chin tucks and thoracic extension consistently for two months will beat someone doing a perfect routine for four days and quitting.
Ergonomics and gradual loading deserve more credit than they get. The approach emphasizes that sustainable correction comes from stacking small daily changes, not chasing a quick fix. If you notice numbness, weakness, or pain that keeps climbing instead of settling, that’s your cue to involve a clinician, not push through it.
— Madhukar
Ready for a Structured Program Instead of Guesswork Exercises?
Piecing together exercises from scattered videos is how most people stall out around week three, unsure if they’re progressing or just sore. A structured sequence builds from chin tucks to full retraction protocols with habit-change coaching to keep you consistent past the point where motivation usually fades.

The forward head posture exercise collection walks through progressions in the order your neck actually needs them, and the cervical retraction rehabilitation guide breaks down the exact mechanics covered in the exercise library above. If you’re building a broader mobility plan alongside your neck work, this mobility restoration checklist is a useful companion for tracking progressive gains. Start with the main program guide and pick the routine that matches where your neck is today.
Sources
- Restoring cervical lordosis by cervical extension traction methods in the treatment of cervical spine disorders: a systematic review of controlled trials
- Efficacy of Modified Cervical and Shoulder Retraction Exercise in Patients With Loss of Cervical Lordosis and Neck Pain
This article is general information, not a substitute for advice from a qualified doctor. Consult a qualified healthcare professional about your own circumstances before acting on anything here.