A short daily routine of chin tucks, thoracic extensions, scapular squeezes, and a doorway pec stretch is the most practical way to improve neck alignment and reduce the forward head drift that causes most chronic neck pain. You can start right now with this five-move sequence:
- Chin tuck (retraction): several reps with brief holds, performed seated or lying down
- Thoracic extension over a chair back: a few slow reps with short holds at end range
- Scapular squeeze: multiple reps with short holds, shoulders relaxed
- Doorway pec stretch: hold stretch for a moderate duration per side, with gentle tension only
- Upper trapezius stretch: hold stretch for a moderate duration per side, avoiding forcing
Do this sequence once in the morning and once in the afternoon. Most people feel a noticeable difference in neck tension within a week of daily practice.
Safety note: Stop any exercise immediately if you feel worsening pain, numbness or tingling into your arm or hand, or sudden severe headache, and consult a healthcare provider before continuing.
Key Takeaways
A short daily routine combining chin tucks, thoracic extensions, scapular squeezes, and chest stretches, done consistently over four weeks, is the most practical way to improve neck alignment and reduce forward head posture.
| Point | Details |
|---|---|
| Start with chin tucks | Do 10 reps with a 2-second hold, 3–4 times daily; this is the most clinically supported first exercise. |
| Address the whole chain | Thoracic extension and scapular strengthening are as important as direct neck work for lasting alignment. |
| Use the wall test | Check your head-to-wall gap every two weeks to track real progress objectively. |
| Hourly reset habit | A 2-minute posture reset every 60 minutes produces more cumulative benefit than one longer session. |
| Red flags to watch | Stop and seek care if symptoms radiate into the arm, hand, or fingers, or if balance is affected. |
| Bestforwardheadposturefix | Offers structured programs and science-backed guides for forward head posture correction beyond this routine. |
Table of Contents
- What is forward head posture and why does it cause so much pain?
- How to check whether your neck is misaligned right now
- Why the head drifts forward: causes and the muscles you need to target
- Neck alignment exercises: chin tucks and retraction progressions
- Stretching to release the muscles pulling your head forward
- Thoracic extension and scapular work: fixing the foundation
- How to build a 4-week daily program
- Ergonomic and daily habit changes that protect your progress
- Safety, red flags, and exercise modifications
- Why this combined approach works: the research behind it
- Structured programs and deeper guidance at Bestforwardheadposturefix
- Sources
What is forward head posture and why does it cause so much pain?
Neutral head alignment means your ears sit directly over your shoulders when viewed from the side. Forward head posture (FHP) is what happens when the head migrates in front of that line, which is the default outcome of hours spent looking at screens, phones, or a desk without postural awareness.
The symptoms are familiar: neck stiffness that never fully goes away, tension headaches that start at the base of the skull, upper back tightness between the shoulder blades, and a reduced ability to turn your head fully to either side. Some people also notice jaw tension or a dull ache that runs into the shoulder.
The mechanical problem is straightforward but serious. For every inch the head moves forward of neutral, the effective load on the cervical spine roughly doubles. A head at neutral weighs around 10 to 12 pounds, but when it moves forward significantly, the load on the neck structures increases substantially. That sustained load compresses discs, strains posterior ligaments, and forces the deep neck flexors to work constantly just to keep the head from dropping further. Over time, the muscles that should hold the head up fatigue and lengthen, the chest and anterior neck muscles shorten, and the pattern becomes self-reinforcing. Exercises alone break that cycle only when they address every link in the chain.
How to check whether your neck is misaligned right now
You do not need a clinician or special equipment to get a useful baseline. Two simple checks, done consistently, give you enough information to track real progress.
The wall test
- Stand with your back against a flat wall, heels about two inches from the baseboard, and shoulder blades lightly touching the surface.
- Let your arms hang naturally at your sides.
- Notice where the back of your head lands. In neutral alignment, it should touch the wall without you having to tuck your chin or strain your neck backward.
- If you have to actively push your head back to reach the wall, or if your chin juts upward when you do, your head is sitting forward of neutral.
- Measure the gap between the wall and the back of your head with your fingers. One finger-width is mild; three or more is significant. Record this number as your baseline.
Repeat the wall test every two weeks at the same time of day, ideally before your exercise session, not after.
The photo method
Stand in your normal posture (do not “fix” it for the photo) and have someone take a side-profile photo from about six feet away, with the camera at shoulder height. Place a small piece of tape on the bony point of your shoulder (the acromion) and another on your earlobe before the photo so you have clear landmarks.
In the photo, draw a vertical line down from your ear marker. If your shoulder marker falls behind that line, your head is forward. The greater the horizontal distance between the two points, the more pronounced the posture. Repeat with the same setup, same distance, and same clothing every two to four weeks. The photo is more objective than the wall test for tracking gradual change.
Why the head drifts forward: causes and the muscles you need to target
The most common driver is sustained flexed posture: looking down at a phone, hunching over a keyboard, or sitting with the monitor too low. These positions are not inherently harmful in short doses, but most people hold them for hours without a break, and the body adapts structurally to whatever position it spends the most time in.
Weak mid-back muscles are the other major contributor, and addressing musculoskeletal health through facilities like OsteoStrong East Boca can support recovery and strength restoration. When the rhomboids, middle trapezius, and serratus anterior cannot hold the shoulder blades in a stable position, the shoulders round forward, the thoracic spine flexes, and the head follows. Tight pectoral muscles accelerate this by pulling the shoulders inward, which tilts the entire upper body into a forward lean.
The key muscles involved split into two groups. The muscles that pull the head forward and become overactive or shortened include the sternocleidomastoid (SCM), the scalenes, the upper trapezius, the levator scapulae, and the pectoralis major and minor. The muscles that become weak and lengthened, losing their ability to hold the head back, include the deep cervical flexors (longus colli and longus capitis), the rhomboids, the middle and lower trapezius, and the thoracic extensors.
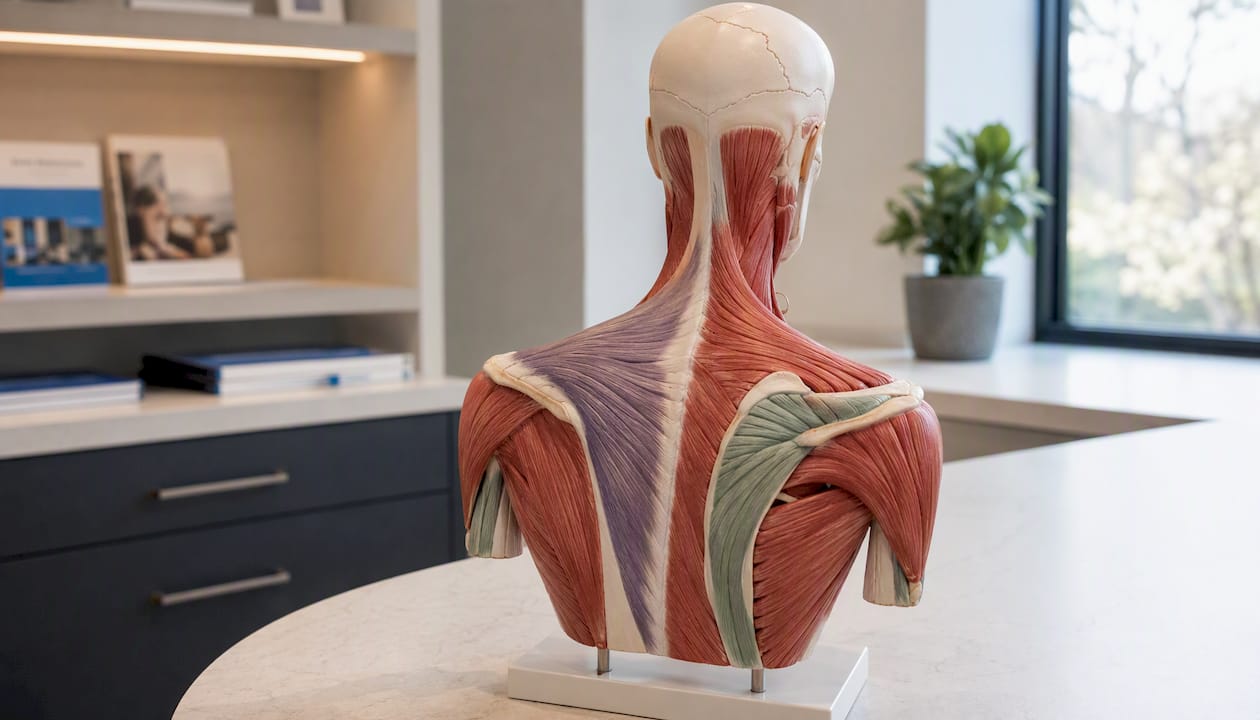
This is why thoracic mobility and scapular strength matter as much as direct neck work. If the thoracic spine cannot extend and the shoulder blades cannot retract, no amount of chin tucking will hold the head in a better position for long. The neck sits on top of the mid-back, and the mid-back sits on top of the pelvis. Fix the foundation and the head follows.
Neck alignment exercises: chin tucks and retraction progressions
Chin tucks are the single most important neck alignment exercise you can do. They directly activate the deep cervical flexors, the small muscles that hold the head in neutral, while simultaneously stretching the suboccipital muscles at the base of the skull. Spine recommends several reps repeated across multiple short sessions daily as a practical starting point.
Supine chin tuck (the safest starting position)
- Lie on your back with knees bent and feet flat. Place a thin pillow or folded towel under your head if needed for comfort.
- Without lifting your head off the surface, gently draw your chin straight back, as if making a “double chin.” Your gaze stays at the ceiling; do not tilt your head up or down.
- Hold for 2 seconds. You should feel a mild stretch at the base of the skull and a gentle activation along the front of the neck.
- Release slowly. That is one rep.
- Complete 10 reps. Rest 30 seconds. Do 2–3 sets.
Seated and standing retraction
Once the supine version feels controlled, move to seated or standing. Sit tall in a chair with your feet flat on the floor. Keep your eyes level and your shoulders relaxed. Draw the head straight back (not up or down) until you feel the same gentle stretch at the base of the skull. Hold 2 seconds, release. The movement is small, maybe half an inch, but the muscle activation is significant.
Wall-assisted retraction
Stand with your back against the wall as in the wall test. Press the back of your head gently into the wall, hold 3–5 seconds, release. This adds light isometric resistance and gives you instant feedback on whether you are moving straight back or drifting into extension.
Progression and dosage
| Stage | Exercise | Reps | Hold | Sets | Frequency |
|---|---|---|---|---|---|
| Week 1–2 | Supine chin tuck | 10 | 2 sec | 2 | 3–4x daily |
| Week 2–3 | Seated retraction | 10 | 2 sec | 3 | 3–4x daily |
| Week 3–4 | Wall-assisted retraction | 10 | 3–5 sec | 3 | 2–3x daily |
| Week 4+ | Resisted isometric hold | 8–10 | 5–8 sec | 3 | 2x daily |
Common errors to fix:
- Looking down while tucking: Keep your gaze level. Looking down turns the chin tuck into a neck flexion exercise, which is not the goal.
- Jutting the chin forward on the release: Control the return. Let the head drift forward slowly rather than snapping back.
- Shoulders rising: If your shoulders creep toward your ears, you are recruiting the upper trapezius instead of the deep flexors. Drop the shoulders first, then tuck.
Stretching to release the muscles pulling your head forward
Tight chest and side-neck muscles actively pull the head forward. Stretching them does not fix posture on its own, but it removes the constant forward tension that makes strengthening exercises harder to feel. The Mayfield Clinic’s home exercise protocol includes the upper trapezius stretch, levator scapulae stretch, and doorway pec stretch as standard components of a neck home program.
Doorway pec stretch
Stand in a doorway with your elbow bent to 90 degrees and your forearm resting against the door frame at shoulder height. Step one foot forward through the doorway until you feel a gentle stretch across the front of the chest and shoulder. Hold 20–30 seconds. Switch sides. Do 2–3 repetitions per side, twice daily.
For a deeper stretch, raise the forearm slightly higher on the frame. If you have a shoulder impingement or rotator cuff issue, keep the arm at or below shoulder height and reduce the forward lean.
Upper trapezius stretch
Sit tall in a chair and hold the seat edge with one hand to anchor the shoulder down. Tilt your head toward the opposite shoulder until you feel a pull along the side of the neck. Do not rotate the head; keep your nose pointing straight forward. Hold 20–30 seconds, 2–3 times per side, twice daily.
Levator scapulae stretch
From the same seated position, rotate your head 45 degrees toward one armpit, then tilt your chin down toward that armpit. You will feel the stretch along the back-side of the neck, running from the base of the skull toward the shoulder blade. Hold 20–30 seconds, 2–3 times per side. This muscle is often the source of the “crick” feeling between the neck and shoulder.
Thoracic extension and scapular work: fixing the foundation
The neck cannot stay in alignment if the mid-back is stiff and the shoulder blades are poorly controlled. Research on thoracic mobility and scapular function consistently shows these regions contribute to cervical posture and symptom improvement, which is why a neck-only approach tends to plateau quickly.
Four mid-back mobility drills
- Foam roller thoracic extension: Place a foam roller perpendicular to your spine at mid-back level. Support your head with your hands, let your upper back gently extend over the roller, and hold briefly. Shift the roller up one segment and repeat. Work through several positions from mid to upper back, doing multiple passes per session.
- Chair-back thoracic extension: Sit in a firm chair and place a rolled towel along the top of the chair back at mid-spine level. Lean back gently over the towel, arms crossed over the chest, and hold briefly. Repeat multiple times.
- Wall angels: Stand with your back flat against the wall, feet a few inches out, and press your lower back, upper back, and head into the wall. Raise your arms to a “goalpost” position (elbows at 90 degrees, upper arms at shoulder height) and slowly slide them up the wall toward overhead, keeping contact throughout. Return slowly. Repeat several times.
- Prone Y-T-W raises: Lie face down with arms extended overhead in a Y shape. Lift both arms a few inches off the floor, squeeze the shoulder blades together, hold 2 seconds, lower. Repeat in T (arms out to sides) and W (elbows bent, hands near shoulders) positions. 8–10 reps each shape.
Scapular strengthening progressions
- Scapular squeeze: Sit or stand tall. Draw the shoulder blades together and slightly downward, as if trying to hold a pencil between them. Hold 3–5 seconds, release fully. 10–15 reps, 2–3 sets.
- Band rows: Anchor a resistance band at chest height. Hold one end in each hand, arms extended. Pull the band toward your lower chest, driving the elbows back and squeezing the shoulder blades together. Hold 2 seconds at the end. 10–15 reps, 2–3 sets.
- Wall slides: Stand facing the wall with forearms flat against the surface. Slide the arms upward while keeping the forearms in contact with the wall, then slide back down. 10 reps.
| Exercise | Beginner | Intermediate | Advanced |
|---|---|---|---|
| Scapular squeeze | 10 reps, bodyweight | 15 reps, add 2-sec hold | 15 reps, light band resistance |
| Band row | Light band, 10 reps | Medium band, 12 reps | Heavy band, 10 reps, 2-sec hold |
| Wall angel | Partial range, 8 reps | Full range, 10 reps | Full range, 12 reps, slow tempo |
| Prone Y raise | 8 reps, no weight | 10 reps, no weight | 10 reps, light dumbbells |
For those with significant mid-back stiffness, start with the chair-back extension and scapular squeeze before adding band resistance. If the foam roller causes sharp pain rather than mild discomfort, skip it and use the chair-back version instead.
How to build a 4-week daily program
The goal in the first four weeks is not to do more exercises. It is to do the right ones consistently enough that the nervous system starts to recognize neutral alignment as the default. Ivy Rehab’s clinical guidance on forward head posture emphasizes starting with small, controlled movements and building gradually, which is exactly how this plan is structured.
- Week 1: Build the habit. Do the five-move morning routine from the opening of this article every day. Add one wall test check at the end of the week. Focus on feeling the chin tuck correctly rather than doing more reps.
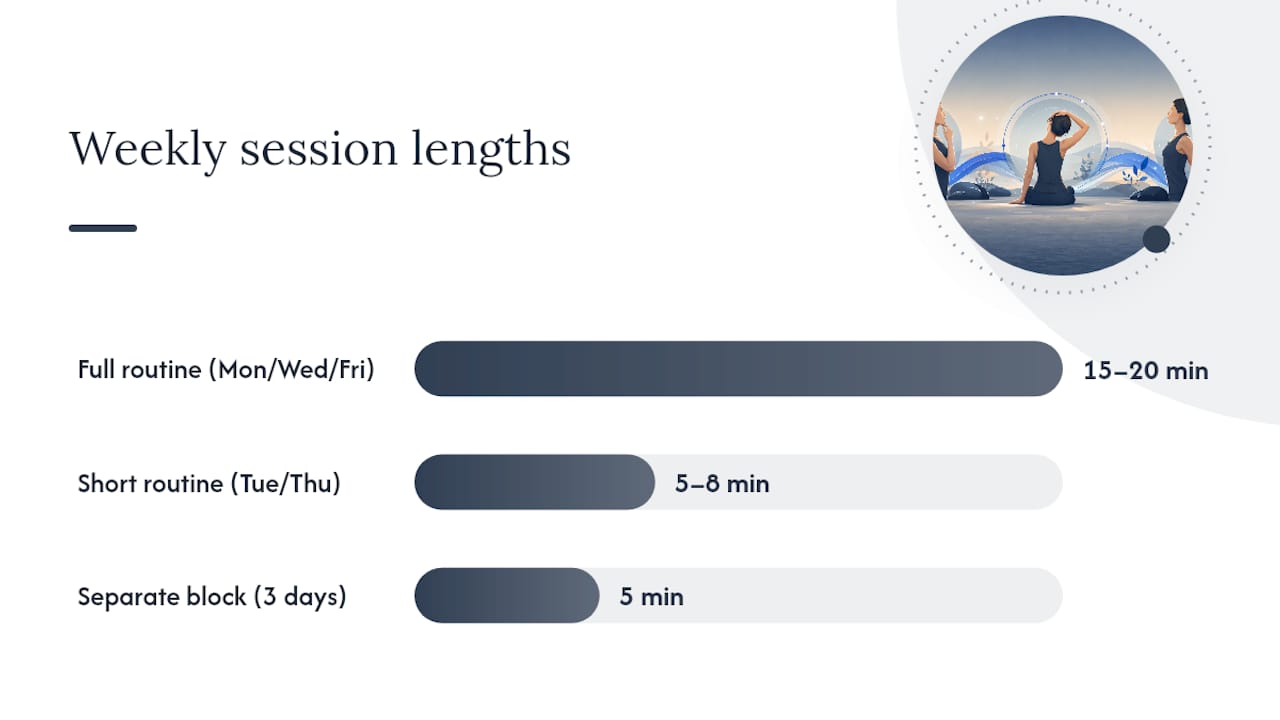
- Week 2: Add the afternoon session. Repeat the same routine in the afternoon. Introduce wall angels and scapular squeezes as a separate 5-minute block on three days. Note any change in your wall-test finger-width gap.
- Week 3: Add resistance and range. Progress chin tucks to the wall-assisted version. Add band rows on three days. Increase thoracic extension to two sets. Take a side-profile photo and compare to your Week 1 baseline.
- Week 4: Integrate and assess. Add the resisted isometric chin tuck hold. Do the full routine twice daily, five days per week. Retest the wall gap and retake the side photo. Most people who have practiced consistently see a visible reduction in the ear-to-shoulder offset by this point.
Sample weekly schedule:
- Monday, Wednesday, Friday: Full routine (chin tucks + stretches + thoracic + scapular rows), 15–20 minutes
- Tuesday, Thursday: Short routine (chin tucks + scapular squeezes + upper trap stretch), 5–8 minutes
- Saturday: Wall test reassessment, foam roller thoracic work
- Sunday: Rest or gentle neck mobility only
Pro Tip: Set a phone alarm for every 60 minutes during your workday. When it goes off, do 5 chin tucks and one scapular squeeze before dismissing it. This single habit, done consistently, produces more cumulative muscle activation than an extra gym session per week.
When you can complete the Week 4 exercises with good form and no discomfort, you are ready to increase band resistance, add prone Y-T-W raises with light dumbbells, or explore neck strengthening progressions for the next phase.
Ergonomic and daily habit changes that protect your progress
Exercises fix the imbalance; habits determine whether it comes back. Consumer and practitioner resources consistently identify ergonomics and frequent movement breaks as the most important complements to any exercise program.
Desk setup:
- Monitor top edge at or just below eye level, screen about arm’s length away
- Chair back supporting the lumbar curve, feet flat on the floor or a footrest
- Keyboard positioned so elbows stay close to the body at roughly 90 degrees
- Laptop users: use an external keyboard and raise the screen with a stand
Phone and device habits:
- Raise the phone to eye level rather than dropping the head to the phone
- Use voice-to-text for longer messages when possible
- Take a 30-second movement break for every 20–30 minutes of screen time
- Avoid scrolling while lying on your side with your head propped at a sharp angle
Walking and sitting posture cues:
- While walking, imagine a string pulling the crown of your head gently upward; let the chin follow naturally rather than tucking it aggressively
- When sitting, think “tall spine” rather than “chest out,” which tends to create an exaggerated arch
- For sleep, a pillow that keeps the head level with the spine (not propped too high or too flat) supports neutral cervical alignment overnight; adjusting your sleep position is one of the most underused tools for sustained improvement
Safety, red flags, and exercise modifications
Most people can start the exercises in this article without medical clearance. The exceptions matter, though, and they are worth knowing before you begin.
Stop and seek medical attention if you experience:
- Pain, numbness, or tingling that radiates into the arm, hand, or fingers during or after exercise
- Sudden severe headache unlike your usual pattern
- Loss of balance, dizziness, or difficulty walking
- Weakness in the arm or hand that is new or worsening
- Symptoms that worsen consistently with every session rather than improving over 2–3 weeks
Modifications for specific conditions:
- Cervical disc herniation: Avoid end-range neck extension. Keep chin tucks in the small-range supine version. Skip the levator scapulae stretch if it reproduces arm symptoms.
- Post-surgical neck: Follow your surgeon’s clearance timeline. Scapular squeezes and gentle thoracic work are often approved earlier than direct neck exercises, but confirm with your provider.
- Osteoporosis: Avoid loaded neck flexion and aggressive foam roller extension. Chair-back thoracic work with a rolled towel is safer than the foam roller for significant bone density loss.
- Acute neck pain flare: Reduce range of motion and hold times by half. Prioritize the supine chin tuck and gentle upper trap stretch only until the acute phase settles.
When symptoms are complex, persistent, or involve the arm, a physical therapist or spine specialist can assess whether there is a structural issue that changes the exercise approach. Physiotherapy-guided correction is particularly useful when home programs plateau or when pain is present at rest.
Why this combined approach works: the research behind it
The exercise-first, kinetic-chain approach in this article is not a trend. It reflects a consistent body of clinical evidence.
Harvard Health’s guidance on neck pain prevention makes the case plainly: correcting neck posture is most effective when it addresses the whole kinetic chain, because tight chest muscles and weak mid-back scapular stabilizers often determine how the head sits on the shoulders. Isolated neck work, without addressing those upstream contributors, tends to produce short-term relief at best.
A peer-reviewed analysis indexed at NCBI found that exercise-based rehabilitation can improve neck pain and function for many patients, with outcomes varying by intervention type and study design. The implication is practical: the specific combination of exercises matters, not just the fact of exercising.
Key evidence-based takeaways for your routine:
- Chin tucks with 8–10 reps across multiple short daily sessions are the most clinically supported starting point for cervical retraction, per Spine.org’s patient guidance
- Combining chin tucks with upper back strengthening and chest stretches retrains the muscles supporting the head without forcing the neck into a rigid position, per Ivy Rehab’s clinical resources
- Thoracic mobility and scapular function are documented contributors to cervical posture improvement, supported by clinical research available through NCBI
- The Mayfield Clinic’s home program framework, which includes 20-second stretch holds and 8–20 rep strengthening sets, provides a practical frequency model that translates directly into the 4-week plan above
The research consensus: a multi-region program targeting the neck, mid-back, and chest consistently outperforms single-region neck exercise for both pain reduction and postural improvement.
For deeper reading, the sources listed at the end of this article link directly to the clinical protocols and peer-reviewed studies that informed this routine.
What most people get wrong about fixing their neck posture
Most people who try to fix forward head posture focus almost entirely on the neck itself, doing chin tucks diligently while sitting in the same slouched position for eight hours a day. The exercises help, but they are fighting against a structural environment that is constantly undoing the work.
The single highest-leverage change is not an extra exercise. It is the hourly posture reset: every 60 minutes, stand up, do five chin tucks, squeeze the shoulder blades together for three seconds, and take three slow breaths with the chest open. That two-minute reset, done eight times across a workday, accumulates more corrective muscle activation than a 20-minute session done once and then forgotten.
The other thing most people underestimate is how long genuine structural change takes. Measurable improvement in the wall test and photo comparison typically appears within 2–6 weeks of consistent daily practice. That is not slow; that is how connective tissue and motor patterns actually adapt. The mistake is expecting to feel “fixed” after three days and quitting when the neck still feels tight on day four. Consistency across weeks, not intensity in a single session, is what moves the needle.
Structured programs and deeper guidance at Bestforwardheadposturefix
The exercises in this article give you a solid starting point, but a structured program makes the difference between a routine you do for two weeks and one that actually changes your posture.

Bestforwardheadposturefix offers in-depth guides, science-backed correction programs, and habit-change frameworks built specifically for people dealing with forward head posture, neck stiffness, and the headaches that come with it. The focus is on education and sustainable correction, not quick fixes or devices that force your neck into position. If you want a step-by-step program that walks you through the full progression from baseline assessment to long-term maintenance, visit Bestforwardheadposturefix and explore the forward head posture exercise library to find the right starting point for your situation.
Sources
- Harvard Health
- Spine
- Mayfield Clinic – Exercises: Neck Stretches & Strengthening
- Ivy Rehab – Forward head posture exercises
- Ncbi
This article is general information, not a substitute for advice from a qualified doctor. Consult a qualified healthcare professional about your own circumstances before acting on anything here.