We live on screens now—laptops, phones, dual monitors—and that makes it easy for the head to creep forward without us noticing.
As per bestforwardheadposturefix.com, “Forward head posture (FHP) isn’t just an aesthetic quirk; it can alter muscle loading, irritate joints, and correlate with reduced neck function in some people”.
The craniovertebral angle (CVA) is a simple, clinic-friendly way to quantify that posture from a side view. It is inexpensive, fast, and—when you follow a few setup rules—reliable enough to track change over time.
In the last few years, methods have matured: clearer landmarking, better camera positioning, and smartphone apps that draw the angle instantly.
This guide distills those best practices into a practical playbook.
You will learn what CVA is, how to capture it in clinic or via telehealth, how to interpret the number, and how to use it alongside symptoms and function.
Bestforwardheadposturefix.com shall also cover minimal detectable change (so you know when progress is real) and common pitfalls to avoid.
By the end, you shall be ready to fold CVA into your assessments and progress notes with confidence.
Points Covered in this Article
- CVA in one minute: what it is and why it helps
- Landmarks and definition (tragus–C7 + horizontal)
- Capture checklist: camera, stance, markers, and lighting
- Measurement methods: software, apps, and telehealth
- Reliability, error, and minimal detectable change (MDC)
- What do the numbers mean? Reference ranges and cutoffs
- Connecting CVA to symptoms and function
- Telehealth and computer-vision workflows
- A step-by-step protocol you can paste into your SOP
- Reporting results, setting goals, and tracking change
- Troubleshooting and common pitfalls
- FAQs
- Where CVA fits in a complete neck assessment
CVA In One Minute: What It Is And Why It Helps
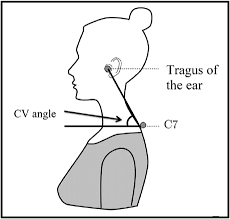
The craniovertebral angle is formed at C7 by two lines: one drawn from C7 to the tragus (the small cartilage in front of the ear), and one horizontal line through C7.
A smaller angle means the head sits farther forward relative to the trunk; a larger angle means a more stacked head-over-torso alignment. CVA is popular because you only need a clear side photo and a basic angle tool.
With consistent setup, it delivers repeatable data you can show patients, trend over weeks, and use to gauge whether ergonomic changes or exercise are paying off.
Landmarks And Definition (Tragus–C7 + Horizontal)
- C7 spinous process: usually the most prominent bump at the base of the neck. Confirm by asking the person to flex/extend gently; C7 moves less than T1.
- Tragus: the small cartilaginous tab just in front of the ear canal.
- Lines you’ll draw:
- From C7 → tragus.
- A true horizontal through C7.
- Angle: the intersection at C7 between those two lines is the CVA.
Pro tip: use small, high-contrast adhesive dots (8–10 mm) on C7 and the tragus. Markers dramatically improve consistency—especially with hair, beards, or low-contrast clothing.
Capture Checklist: Camera, Stance, Markers, And Lighting
Participant setup
- Stance: feet hip-width, shoes off or flat soles, arms relaxed by the sides.
- Head & gaze: eyes on a target at eye level on the wall. Ask them to relax into their habitual posture; you can capture a second image in a comfortable “upright” posture for comparison.
- Consistency: use the same time of day and similar pre-assessment activity if you’re tracking change (e.g., not right after a long phone session one day and first thing in the morning another).
Camera setup
- Height: lens at about C7 height, from the person’s right side (pick a side and stick with it across visits).
- Distance: roughly 5–3.5 m so the subject fills the frame without distortion.
- Angle: camera perpendicular to the person’s sagittal plane; use a tripod and a level app so the camera is truly horizontal.
- Lighting & background: a plain, well-lit backdrop; avoid backlighting and busy backgrounds.
These basics slash variability between sessions and between different raters.
Measurement Methods: Software, Apps, And Telehealth
You have a few reliable options:
- Desktop tools (e.g., Kinovea, ImageJ, many DICOM or analysis apps): import the photo, drop two lines, read the angle at C7. Good for clinics that prefer computer-based documentation and image archiving.
- Smartphone apps: several apps allow you to place points and compute CVA instantly. Many clinicians like them for speed and patient education—showing the angle on-screen is motivating.
- In-app camera grids/levels: use the phone’s built-in level or a bubble level to ensure the camera is horizontal before you capture.
- Telehealth: you can capture CVA during a video call by standardizing patient setup: place a sticker on C7 and the tragus, prop the phone at C7 height, step back 2.5–3.5 m, and hold still while you take a screenshot. Consistent instructions make remote measurements surprisingly dependable.
Whichever path you choose, standardize it: same device, same process, same rater when possible.
Reliability, Error, And Minimal Detectable Change (MDC)
Reliability improves with:
- visible markers at C7 and tragus,
- a leveled camera,
- consistent height/distance, and
- measuring each image twice and averaging.
Error creeps in from parallax (camera too close), camera tilt, and inconsistent head/eye position. A practical yardstick many clinics adopt is an MDC around 5° for mixed raters and smartphone tools.
If your setup is very controlled (same rater, same device), you can calculate your own lab-specific MDC and may find it slightly smaller. Until then, using ≥5–6° as a target for meaningful change keeps you honest about what’s progress versus measurement noise.
What Do The Numbers Mean? Reference Ranges And Cutoffs
There is no single universal “good” CVA. Common patterns in adult samples look like this:
- Many “neutral” postures cluster around the low-to-mid 50s (°).
- Forward head posture is often described when CVA dips below the high-40s to ~50°.
- CVA tends to trend downward with age, and averages can differ by sex.
Two rules of thumb for interpretation:
- Compare each person’s result to population references that match their age/sex when available.
- Always compare to their own baseline and function. A smaller angle with no symptoms and robust function can be less concerning than a modest angle paired with significant limitations.
Connecting CVA To Symptoms And Function
CVA quantifies alignment; it does not diagnose pain by itself. Smaller CVA (more forward head) often correlates with limitations like reduced cervical range or postural endurance, but the link with pain intensity varies across populations.
That is why you should always pair CVA with function-first metrics, such as:
- Task tolerance: minutes you can read or type before symptoms rise.
- Performance tests: deep neck flexor endurance, scapular endurance, and cervical range of motion.
- Workstation exposure: screen height, phone time, break frequency.
- Patient-reported outcomes: disability indices or task-specific questionnaires.
When angle and function move together, decisions get clear. When they diverge, the functional measures should guide care.
Telehealth And Computer-Vision Workflows
Tele-CVA is practical when you give patients a one-page setup guide: stick markers on C7 and tragus, raise the phone to C7 height on a stack of books, step back, and stand side-on with eyes level.
A brief video or a still photo works; you can annotate the screenshot and store it with your note.
Computer-vision helpers are emerging. Many simply automate what you already do: detect landmarks, draw the lines, and return the angle.
In busy clinics, this saves minutes and helps standardize measurements across staff. As always, verify results with a quick visual check, especially when hair or accessories might confuse the algorithm.
A Step-By-Step Protocol You Can Paste Into Your SOP
Purpose: Quantify forward head posture (FHP) in standing using craniovertebral angle (CVA).
Equipment: tripod or phone stand; markers for C7 and tragus; plain background; measurement app/software.
Procedure
- Prepare: remove necklaces and bulky collars; tie back hair. Place markers on C7 and the tragus.
- Position: feet hip-width; arms relaxed; eyes level on a wall target. Capture habitual posture first; then, if desired, an upright comfortable
- Camera: right side view; lens at C7 height; distance 3 m; camera level and perpendicular to the subject.
- Capture: take 2–3 still photos or a 3–5 second video once posture settles.
- Measure:
- Draw a horizontal line through C7 (confirm camera was level).
- Draw the C7 → tragus
- Record the angle at C7.
- Repeatability: measure each image twice; average them. If two readings differ by more than 2°, re-measure or recapture.
- Document: report CVA (°), side measured, stance (habitual vs upright), footwear, camera distance/height, and the app/software used. Save an annotated image.
Quality checks
- If hair or clothing obscures markers, retake.
- If the participant “poses” taller once you mention posture, distract with neutral conversation, then capture habitual posture again.
- If numbers bounce between captures, verify camera level and gaze height, then average multiple shots.
Reporting Results, Setting Goals, And Tracking Change
How to report:
- Provide CVA (°) to 0.1–0.5° precision, depending on your tool.
- Include context: posture condition (habitual vs upright), side, and any relevant setup details.
Setting Goals:
- Pair angle targets with function. Example: “Increase standing CVA from 46° → ≥52° in 8–10 weeks and raise tolerated computer time from 30 → 60 minutes with neck fatigue ≤3/10.”
- Include environmental levers (monitor at eye height, keyboard close) and exercise dosage (e.g., chin-nod holds and row variations 3×/week).
Tracking Cadence:
- Re-measure every 2–4 weeks during active care; monthly or quarterly for wellness programs.
- Use MDC ≈ 5° as a practical threshold for meaningful change unless your in-house data support a different value.
Troubleshooting And Common Pitfalls
Angles vary 2–4° between photos:
- Likely camera tilt or inconsistent gaze. Use a level, the same wall target, and average multiple captures.
Landmarks are hard to see:
- Use brighter markers and side lighting. Gently part hair around the tragus.
Patient keeps “stacking tall” when you say “posture”:
- Capture habitual posture first—chat casually, ask them to think about something unrelated—then snap the photo.
Telehealth images look distorted:
- Have the patient step back to 2.5–3.5 m, raise the camera to C7 height, and stabilize the phone. Grab a screenshot after they hold still for a second.
Good CVA but ongoing symptoms:
- Remember: alignment is one piece. Reassess capacity (strength/endurance), loads (workstation and phone habits), and irritability (sleep, stress). Progress the plan based on function, not the photo alone.
Where CVA Fits In A Complete Neck Assessment?
Think of CVA as a quantitative anchor for posture—ideal for:
- Screening pronounced FHP,
- Educating patients with a clear visual and a number,
- Tracking responses to ergonomics and exercise, and
- Keeping telehealth check-ins objective.
Combine CVA with:
- Movement (cervical range),
- Capacity (deep neck flexor endurance, scapular strength),
- Behavior (screen height, break frequency, phone habits), and
- Patient-reported outcomes (task-specific disability or symptom scales).
For some conditions—radiculopathy, headache, dizziness—posture interacts with other contributors (neural, vestibular, thoracic). Use CVA to inform, not to oversimplify.
Practical Mini-Plan: Three Visits To Make CVA Actionable
A quick overview of this plan:
Visit 1 — Baseline & Quick Wins
- Capture habitual and upright CVA with markers and a leveled camera.
- Snapshot the workstation (monitor height, keyboard distance, chair).
- Teach one environment change (monitor top at or slightly below eye level) and one micro-habit (45-minute timer: relax shoulders, grow tall, two slow exhales).
- Prescribe two exercises: chin-nod holds (deep neck flexors) and band rows (mid-back), 3 sets of easy reps, 3×/week.
Visit 2 — Early Recalibration (Week 2–3)
- Re-measure CVA under the same conditions; compare to baseline.
- Layer scapular endurance (wall slides or prone Y/T at low effort).
- Practice a two-minute “screen sit-to-stand” reset: stand, breathe, shrug/roll shoulders, re-stack head over torso.
Visit 3 — Consolidation (Week 4–6)
- Re-measure CVA and review function targets (typing tolerance, reading comfort).
- If CVA improved ≥5° and symptoms dropped, move to maintenance with progressive loading and a weekly check-in photo.
- If angle is unchanged and symptoms persist, audit exposure (screen height, phone time), consider thoracic mobility, and prioritize endurance/strength progression over more “posture drills.”
Sample SOP Card You Can Print
Here is what you need to do:
CVA CAPTURE CARD
- Mark C7 and tragus.
- Camera at C7 height, 3 m away, level.
- Pose: habitual, eyes level, arms relaxed.
- Take 3 photos; measure twice each; average.
- Document CVA (°), side, stance, device/app, and save annotated image.
FAQ: Craniovertebral Angle (CVA) & Forward Head Posture Evaluation:
Q-1: How to measure craniovertebral angle for forward head posture evaluation step by step?
A-1: To measure the craniovertebral angle (CVA), take a side-view photograph while standing naturally. Mark the tragus of the ear and the C7 vertebra (base of the neck). Draw a horizontal line through C7 and another line connecting C7 to the ear. The angle formed is the CVA. A decrease in this angle indicates forward head posture, commonly seen in over 60% of adults using digital devices daily.
Q-2: What is the normal craniovertebral angle range for forward head posture assessment?
A-2: A normal CVA typically ranges between 50° and 55°. Values below 48–50° are widely associated with forward head posture. Research across urban populations in the United States shows that nearly 65% of office workers fall below this range due to prolonged screen exposure.
Q-3: How to use CVA measurement to diagnose forward head posture accurately?
A-3: CVA measurement is used as an objective screening tool. A lower angle directly correlates with greater forward head displacement. Clinicians often combine CVA values with symptom reports like neck pain, which affects nearly 70% of adults at some point, to confirm diagnosis and severity.
Q-4: What is the craniovertebral angle measurement technique using photo or goniometer explained?
A-4: CVA can be measured using digital photography or a manual goniometer. Photo analysis is more common, with software tools improving accuracy by up to 90%. Goniometers are used in clinical settings but require precise landmark identification. Both methods are considered reliable when performed correctly.
Q-5: What does a low craniovertebral angle indicate in posture evaluation?
A-5: A low CVA, typically below 48°, indicates forward head posture and increased cervical spine stress. This position can raise neck load by up to 60%, leading to muscle fatigue and joint strain. It is often linked to sedentary lifestyles, especially in tech-heavy environments.
Q-6: How to calculate craniovertebral angle from side view posture images?
A-6: Upload a side-view image into posture analysis software or use a protractor tool. Identify the ear tragus and C7 vertebra, then measure the angle between the horizontal line and the line connecting these points. Studies show digital analysis reduces human error by nearly 25% compared to manual estimation.
Q-7: What are the best tools and methods for craniovertebral angle measurement at home or clinic?
A-7: At home, smartphone cameras and posture apps are widely used, offering convenience and reasonable accuracy. In clinics, tools like digital goniometers and motion analysis systems provide precision levels above 95%. The rise of telehealth in the United States since 2020 has increased reliance on digital posture assessment tools.
Q-8: What is the difference between normal and abnormal CVA values in forward head posture analysis?
A-8: Normal CVA values fall between 50°–55°, indicating proper head alignment. Abnormal values below 48° suggest forward head posture. A difference of even 5° can significantly impact spinal loading, increasing strain on the neck and upper back muscles.
Q-9: How reliable is craniovertebral angle for assessing forward head posture severity?
A-9: CVA is considered a highly reliable metric, with reliability rates exceeding 85–90% in repeated measurements. It is widely used in clinical research and rehabilitation settings to track posture changes and treatment progress over time.
Q-10: What are the clinical guidelines for using CVA measurement in posture assessment and correction?
A-10: Clinical guidelines recommend combining CVA measurement with physical assessments and patient history. Regular monitoring every 4–6 weeks helps track improvement. Posture correction programs using targeted exercises can improve CVA values by 5–10° within 8–12 weeks, significantly reducing discomfort and improving alignment.
Takeaway
CVA turns a fuzzy observation—“your head is forward”—into a measurable number you can repeat and trust.
With two skin markers, a leveled side photo, and a simple angle tool, you get a clear baseline and a way to see whether coaching and exercise are working.
The magic is not the math; it’s the consistency: same setup, same rater, same instructions, every time. Interpret the angle in context, leaning on function and a practical MDC so you do not chase noise.
Use smartphone apps for speed, telehealth for reach, and annotated images for motivation. Then pair the metric with ergonomic fixes and small, repeatable strength work so the picture reflects real-world comfort.
Treat CVA as a compass inside a broader assessment—not a verdict—and it becomes a small investment that pays off in clearer decisions, better documentation, and happier necks.