The most effective thoracic mobility drills you can do right now are thread-the-needle, foam roller thoracic extension, quadruped T-spine rotation, open-book/side-lying windmill, bench or dowel-assisted extension, wall-supported rotation, and the spiderman deep-squat with rotation. LiveEmbody recommends short daily routines lasting several minutes that train extension, rotation, and side-bend together for practical, functional change.
Your 5–10 minute starter plan:
- Foam-roller thoracic extension: 6–8 reps, 3 positions along the mid-back
- Thread-the-needle: 8 reps per side
- Open-book: 8 reps per side with breath
- Quadruped T-spine rotation: 6 reps per side
- Wall-supported rotation: 8 reps per side
Minimal equipment you need:
- Foam roller (or a tightly rolled towel as a substitute)
- Dowel, PVC pipe, or a bench edge
- Resistance band
- A clear wall space
Key Takeaways
Consistent daily practice of a short, varied thoracic mobility routine produces measurable range-of-motion gains within two weeks and meaningful postural change within 4–8 weeks.
| Point | Details |
|---|---|
| Start with 5–10 minutes daily | Foam-roller extension, thread-the-needle, and open-book cover the core movement planes. |
| Prioritize dissociation over force | Moving ribs independently of the pelvis builds motor control that lasts longer than passive stretching. |
| Test progress weekly | Seated rotation, overhead reach, and prone press-up give repeatable, observable benchmarks. |
| Combine drills with scapular work | Thoracic mobility paired with scapular retraction produces visible postural change, not just temporary relief. |
| Bestforwardheadposturefix for structure | The site’s guided posture programs connect thoracic drills to a full FHP correction plan with ergonomics and habit guidance. |
Table of Contents
- Before you start: what should you check first?
- How to do thread-the-needle for thoracic rotation
- How to use a foam roller for thoracic extension safely
- Quadruped T-spine rotation: keeping the lumbar quiet
- Open-book and side-lying windmill for ribcage mobility
- Thoracic extension on a bench or with a dowel
- Wall-supported T-spine rotation: instant feedback for desk workers
- Spiderman and deep-squat rotation: mobility in motion
- How to program these drills for real results
- How do you know your thoracic mobility is improving?
- Common mistakes, compensations, and when to get help
- What actually works long-term: a practitioner’s perspective
- Posture resources that go deeper than a single drill
- Sources
Before you start: what should you check first?
The thoracic spine sits between your neck and lower back and is responsible for most of your upper-body rotation and extension. When it stiffens, the body redistributes stress to the shoulders and neck, which is a primary driver of forward head posture. The NCBI’s clinical anatomy resources confirm this load-transfer pattern as a core rationale for targeted mid-back mobility work.
Red flags: stop and see a clinician if you have:
- Sharp, stabbing, or radiating pain into the arms or legs
- Numbness, tingling, or weakness in the extremities
- Recent spinal fracture, surgery, or diagnosed osteoporosis
- Unexplained pain that worsens with movement
Three quick baseline checks:
- Seated rotation test: Sit upright in a chair, cross your arms over your chest, and rotate left and right. Note where you feel restriction and whether one side is noticeably tighter.
- Prone extension test: Lie face-down and press up onto your forearms. A stiff thoracic spine limits how much your chest lifts without your lower back arching sharply.
- Overhead reach test: Stand against a wall and raise both arms overhead. Watch whether your ribs flare out or your lower back arches before your arms reach vertical.
Equipment alternatives: A tightly rolled bath towel works in place of a foam roller. A folded blanket under your knees replaces a pad. A broom handle substitutes for a PVC dowel.
Pro Tip: Place a small ball or your fist between your knees during floor drills. If the ball drops, your pelvis has rotated. This tactile cue is one of the fastest ways clinicians teach patients to stop “cheating” with the lumbar spine.
How to do thread-the-needle for thoracic rotation
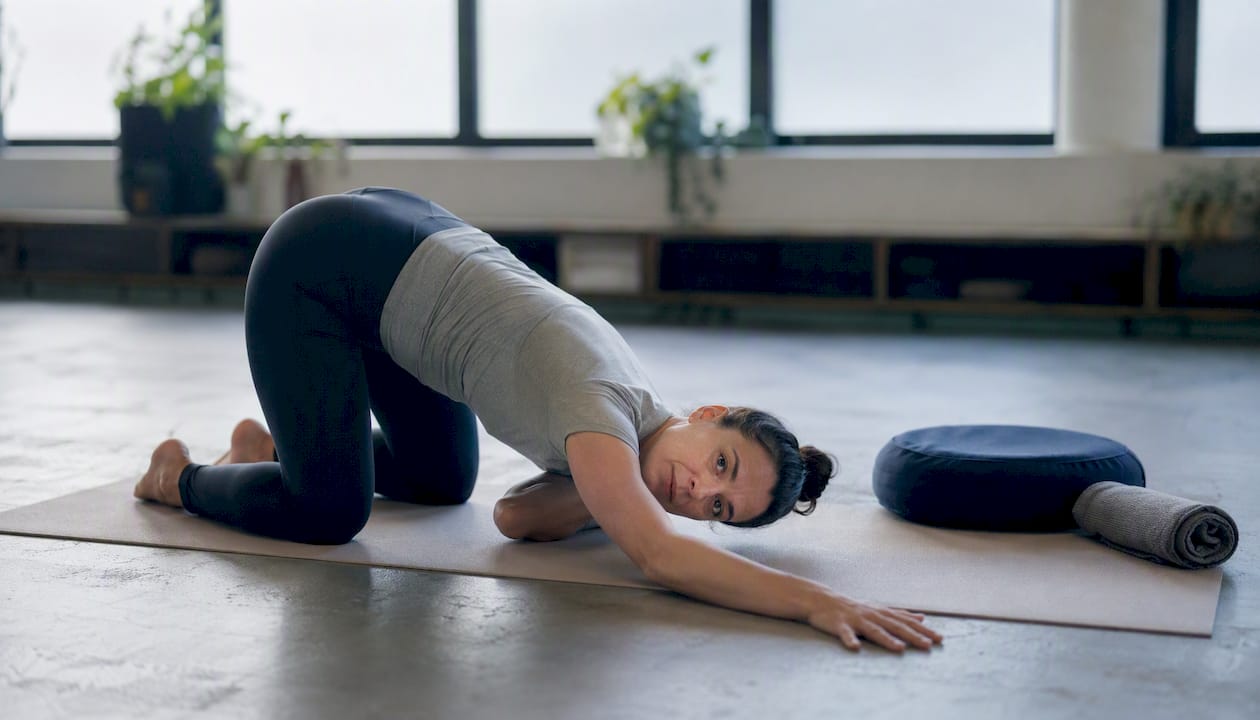
Thread-the-needle isolates thoracic rotation in a quadruped position, making it one of the cleanest drills for teaching the mid-back to move independently of the hips. Motion Longevity’s rotation drill library emphasizes slow, breath-focused execution for this exact reason.
Step-by-step:
- Start on hands and knees: wrists under shoulders, knees under hips.
- Brace your core lightly so your lower back stays neutral.
- Lift your right hand off the floor and slide it palm-up under your left arm, reaching toward the left wall.
- Let your right shoulder drop toward the floor. Your gaze follows your hand.
- Pause at the end of your comfortable range for 1–2 seconds.
- Reverse the motion and open your right arm up toward the ceiling, rotating your chest to face right.
- Hold the open position for 1–2 seconds, then return to start.
Reps/sets: 6–10 reps per side, 2–3 sets. Move slowly; this is not a stretch you force.
Common mistakes:
- Hips rotating with the upper body: press your knees gently into the floor and keep them stacked under your hips throughout.
- Shoulder shrugging on the supporting arm: keep the supporting shoulder packed down, not hunched toward your ear.
- Rushing through the range: the value is at the end of your comfortable rotation, not in the speed.
Progressions: Add a 3–5 second hold at the open position. Move to tall-kneeling to reduce base of support. For a regression, perform the drill seated in a chair with your arms crossed.
Pro Tip: Track your rotating hand with your eyes. Your gaze drives cervical rotation, which in turn pulls more thoracic rotation out of the movement. Readers who feel stuck often unlock an extra few degrees just by letting their eyes lead.
How to use a foam roller for thoracic extension safely
Foam-roller thoracic extension is one of the most direct ways to restore extension through the mid-back. ACE Fitness guidance confirms that this drill increases thoracic extension capacity and can improve active shoulder overhead range of motion when used in warm-ups.
Step-by-step:
- Place the foam roller perpendicular to your spine at the level of your mid-back (roughly T6–T8 to start).
- Sit in front of the roller, then lean back so your mid-back contacts it.
- Support your head with both hands interlaced behind your neck, elbows pointing forward.
- Keep your knees bent and feet flat on the floor.
- Inhale to prepare, then exhale slowly as you let your upper back drape over the roller.
- Hold 2–3 seconds at the bottom, then use your core to return to the start position.
- Shift the roller one hand-width up or down and repeat.
Reps/sets: 6–8 reps at each of 2–3 positions along the mid-back. Spend more time at the stiffest segment.
Equipment note: A medium-density roller works for most people. A very firm roller can be uncomfortable on bony segments; a rolled towel is a gentler alternative that still produces useful extension.
Progressions: Once extension feels comfortable, add an overhead reach at the bottom of the movement. Holding a dowel with both hands and reaching it overhead while draped over the roller trains active thoracic extension and shoulder flexion simultaneously.
Quadruped T-spine rotation: keeping the lumbar quiet
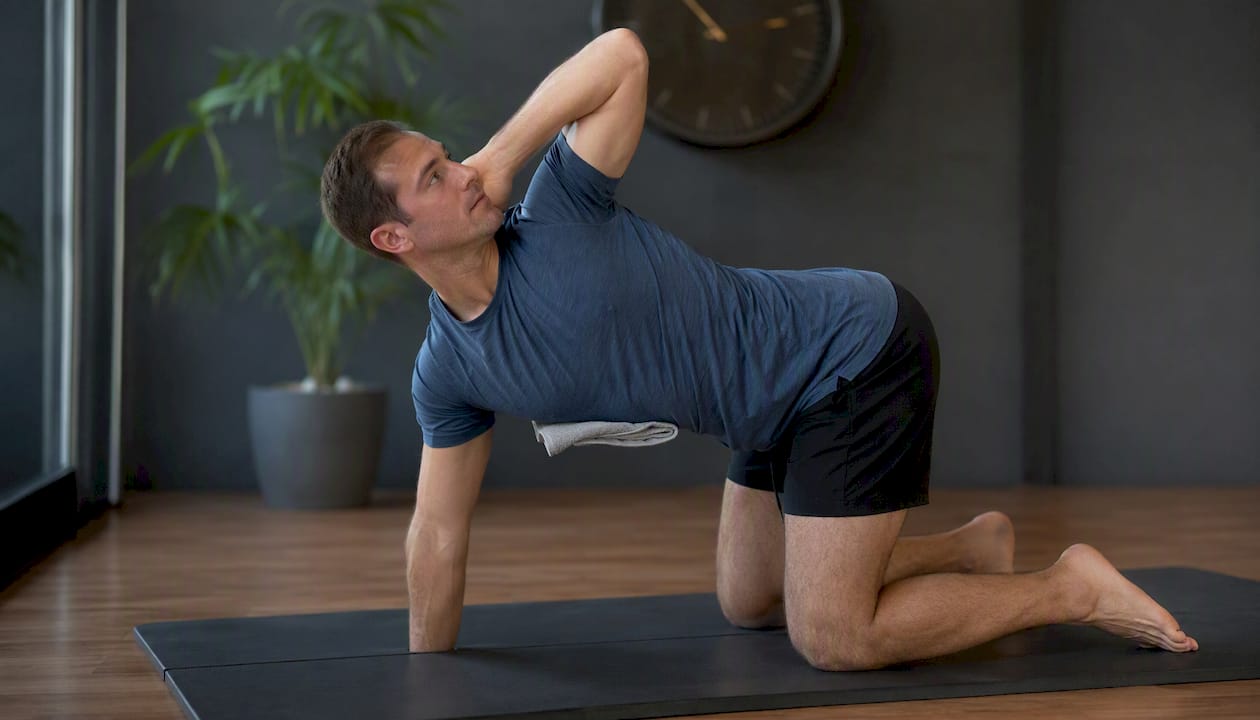
This drill looks almost identical to thread-the-needle but the goal is different: it trains controlled, deliberate rotation with a braced core, building the motor control that transfers to sport and daily movement.
Step-by-step:
- Set up on hands and knees, wrists under shoulders, knees under hips.
- Brace your core as if you expect a light punch to the stomach.
- Place your right hand lightly behind your right ear, elbow pointing out to the side.
- Keeping your hips and lower back completely still, rotate your right elbow up toward the ceiling.
- Pause at the top for 1 second, then slowly return.
- Complete all reps on one side before switching.
Reps/sets: 5–8 reps per side, 2–3 sets. Slow is the point here; a 3-second ascent and 3-second descent builds more motor control than a fast rep.
A 2024 trial of 39 participants found equivalent short-term range-of-motion gains between quadruped and standing rotation variants over two weeks, which means you can choose whichever position fits your space or comfort level without sacrificing results.
Pro Tip: Press a small ball or folded towel between your lower ribs and the floor at the start of the movement. If you feel it shift, your ribs have dropped and your lumbar spine has taken over. Keep the ball in place throughout the set.
Progressions: Loop a light resistance band around your wrists for added rotational load. Once motor control is solid, increase tempo slightly and coordinate the rotation with your exhale.
Open-book and side-lying windmill for ribcage mobility
The open-book drill is a low-cheat rotation that lets gravity assist the movement while your breathing drives rib expansion. It pairs well with the quadruped drills above because it works rotation from a completely different position.
Step-by-step:
- Lie on your side with your hips and knees stacked at roughly 90 degrees.
- Extend both arms straight out in front of you at shoulder height, palms together.
- Inhale to prepare.
- As you exhale, slide your top hand along the floor in a wide arc, opening your chest toward the ceiling.
- Let your gaze follow your moving hand.
- Breathe into your upper ribs at the end of the range; each exhale can deepen the rotation slightly.
- Inhale to return your arm to the start position.
Reps/sets: 8 reps per side, 2 sets. Use a pillow between your knees if your hips want to roll open.
Common mistakes and fixes:
- Knees separating: Keep them glued together or use a pillow. The moment the knees part, the pelvis rotates and the lumbar spine does the work.
- Rushing the arm arc: The rotation should feel like it comes from your ribs peeling open, not your shoulder swinging.
- Holding your breath: Breath is the mechanism here. Inhale to set up, exhale through the rotation.
Progression: Once you reach a comfortable end range, add a dynamic reach by extending your top arm fully and sweeping it overhead in a full windmill arc before returning.
Thoracic extension on a bench or with a dowel
This drill directly targets the upper thoracic segments that stiffen with prolonged sitting and forward head posture, making it especially relevant for neck alignment and overhead prep. Elite Performance Institute’s exercise library stresses that pelvic control during these drills is what protects the lumbar spine.
Step-by-step:
- Kneel in front of a bench or sturdy chair, placing both forearms on the surface.
- Walk your knees back until your hips are roughly over your knees and your torso is angled downward.
- Let your chest drop toward the floor, allowing your thoracic spine to extend.
- Hold 3–5 seconds at the bottom, breathing steadily.
- Use your arms to press back to the start position.
Reps/sets: 8–10 reps, 2–3 sets. Pause at the bottom of each rep rather than bouncing.
Equipment alternative: If you have no bench, place a tightly rolled towel under your mid-back while lying on the floor and extend over it, similar to the foam-roller technique.
Progressions: Hold a dowel with both hands and reach it overhead as you drop into extension. This integrates shoulder flexion with thoracic extension, which is the exact pattern needed for overhead pressing and pulling movements. Work through different bench heights to shift the extension focus up or down the spine.
Wall-supported T-spine rotation: instant feedback for desk workers
The wall gives you something the floor drills cannot: immediate, honest feedback about whether your hips are staying still. This makes it one of the best drills for office workers who have never learned to dissociate their thoracic spine from their pelvis.
Step-by-step:
- Take a half-kneeling position facing away from the wall, with your back knee on the floor and front foot flat.
- Place a folded towel or small ball between your back knee and the wall so your hip is lightly pressed against it.
- Cross your arms over your chest or place your hands behind your head.
- Rotate your upper body toward your front leg, keeping the ball or towel in contact with the wall.
- Pause at the end of your comfortable range for 1–2 seconds, then return.
Reps/sets: 8 reps per side, 2–3 sets. Half-kneeling positions are well-documented regressions that reduce hip and lumbar cheating while isolating thoracic rotation for sport-specific transfer.
Regression: If half-kneeling is uncomfortable, perform the drill standing with your back against the wall, feet a few inches from the baseboard, and rotate while keeping your lower back in contact with the wall.
Pro Tip: The moment you feel the ball or towel shift away from the wall, you have run out of thoracic rotation and your hip has started to compensate. That is your actual end range. Work there, not past it.
Spiderman and deep-squat rotation: mobility in motion
Static drills build range; this one teaches your body to use it. The spiderman with thoracic rotation loads the mid-back in a functional lunge position, which is why Muscle & Fitness links this drill category directly to rotational power and hip-to-upper-body separation in athletic tasks.
Step-by-step:
- Start in a high push-up position.
- Step your right foot outside your right hand, landing in a deep lunge.
- Keep your left leg extended and your hips low.
- Place your right hand behind your right ear, elbow pointing out.
- Exhale and rotate your right elbow up toward the ceiling, keeping your hips as square as possible.
- Hold 1 second at the top, then return your hand to the floor.
- Complete all reps on one side, then switch legs.
Reps/sets: 5–8 reps per side, 2–3 sets. Use this as a warm-up drill before rotational sport, lifting, or any overhead work.
Common mistakes and progressions:
- Hips rising: Keep them low and level throughout. If they pop up, shorten your step.
- Rotation from the lower back: The elbow drives the motion; the ribs follow. If you feel it in your lumbar spine, slow down and reduce range.
- Progression: Once the bodyweight version is clean, add a light kettlebell held in the rotating hand for an overhead reach at the top. Landmine rotations are the next logical step for athletic transfer.
How to program these drills for real results
2-week starter plan:
- Days 1–3: Foam-roller extension (3 positions, 6 reps each) + thread-the-needle (8 reps/side) + open-book (8 reps/side). Morning or pre-workout.
- Days 4–7: Add quadruped T-spine rotation (6 reps/side) and wall-supported rotation (8 reps/side).
- Week 2: Add bench/dowel extension and spiderman rotation. Increase reps by 2 per exercise. Begin integrating into warm-ups before training sessions.
Progression rules: Increase range before adding load. Add load before adding speed. Never force end-range; work at the edge of comfortable motion and let the range expand over days, not within a single session.
Timeline: Short-term neurological changes in range of motion can appear within a single session. Structural and motor-control changes take longer. The 2024 PubMed trial showed measurable ROM gains in just two weeks with consistent daily practice. Meaningful postural change typically requires 4–8 weeks of regular work. For desk workers, short frequent doses throughout the day tend to outperform one long weekly session.
| Drill | Primary purpose | Equipment | Best use-case |
|---|---|---|---|
| Foam-roller extension | Thoracic extension | Foam roller or rolled towel | Morning reset, warm-up |
| Thread-the-needle | Thoracic rotation | None | Desk break, warm-up |
| Quadruped T-spine rotation | Rotation + motor control | Optional ball/band | Warm-up, rehab |
| Open-book / windmill | Rotation + rib mobility | Optional pillow | Desk break, warm-up |
| Bench / dowel extension | Extension + shoulder prep | Bench, dowel, or towel | Pre-lift warm-up |
| Wall-supported rotation | Rotation with feedback | Wall, ball, or towel | Rehab, desk workers |
| Spiderman + rotation | Integrated mobility | Optional kettlebell | Athletic warm-up |
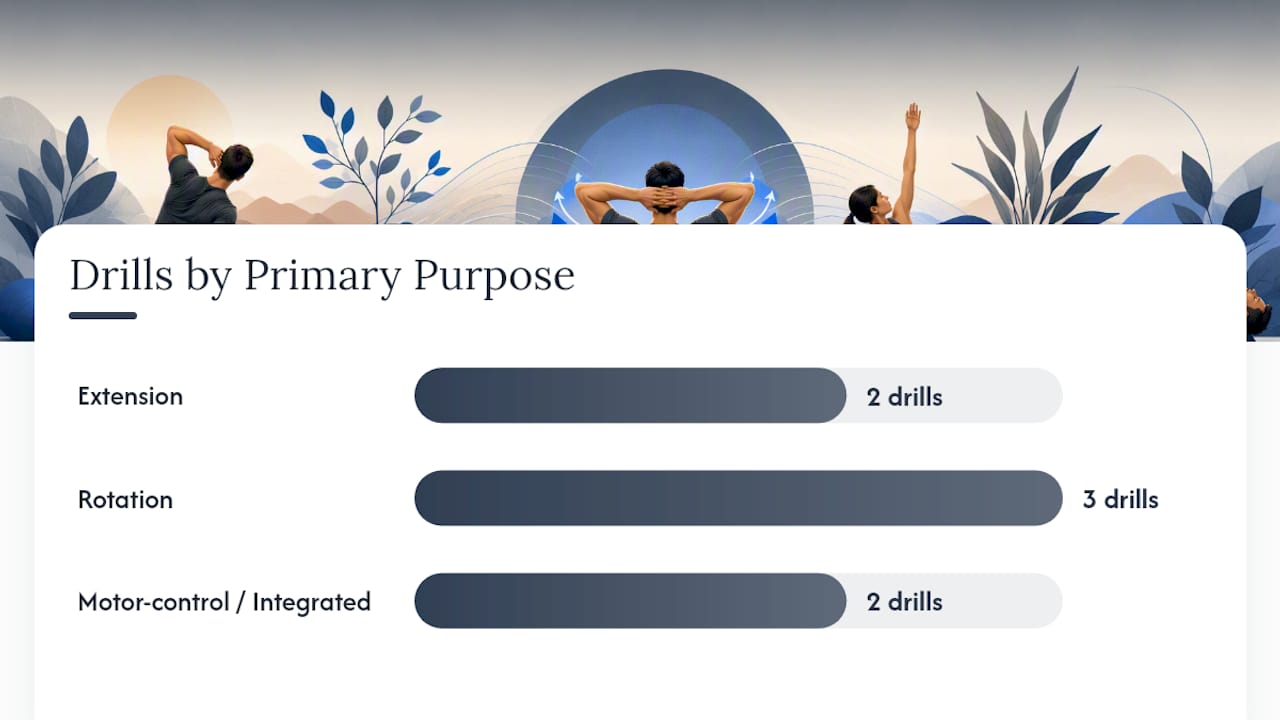
A 3D approach combining extension, rotation, and breathing consistently outperforms single-plane stretching for functional mobility gains, which is why the plan above mixes drill types rather than repeating one movement pattern.
How do you know your thoracic mobility is improving?
Run these checks weekly, ideally at the same time of day.
| Test | What it measures | Sign of improvement |
|---|---|---|
| Seated rotation | Thoracic rotation ROM | Smoother motion, less neck compensation |
| Overhead reach at wall | Extension + shoulder flexion | Arms reach higher before ribs flare |
| Prone press-up | Thoracic extension | Chest lifts higher with less lumbar arch |
| Spiderman rotation | Functional rotation depth | Elbow reaches higher, hips stay lower |
What meaningful progress actually looks like:
- Less stiffness in the first few reps of each drill (your “warm-up range” improves)
- Scapulae glide more smoothly during overhead movements
- Neck and shoulder tension decreases after a session rather than staying the same
- You can rotate further in the seated test without your whole torso twisting
Test weekly, not daily. Day-to-day variation is normal and tells you little. A consistent trend over 2–4 weeks is the signal worth tracking. Pairing thoracic work with scapular retraction exercises accelerates visible postural change because the two systems work together.
Common mistakes, compensations, and when to get help
The most frequent errors:
- Lumbar rotation instead of thoracic: The hips and lower back rotate while the mid-back barely moves. Fix: use a wall, ball between knees, or half-kneeling position to block pelvic movement.
- Shoulder shrugging: The supporting shoulder creeps toward the ear during quadruped drills. Fix: actively depress the shoulder blade before each rep.
- Forcing end-range: Pushing past comfortable motion with momentum or body weight. Fix: work at 80% of your available range and breathe into the restriction.
- Holding your breath: Tension in the respiratory system limits thoracic mobility directly. Fix: exhale through every rotation or extension.
- Asymmetry ignored: One side rotates significantly less than the other. Fix: add one extra set on the restricted side and check for hip or shoulder compensation on that side specifically.
Troubleshooting stubborn stiffness: If range is not improving after two weeks, increase frequency before increasing intensity. Add a session mid-day. Check whether you are actually moving your ribs or just your arms. Myofascial release techniques applied before mobility work can reduce tissue resistance and make drills more effective.
Good posture recovery after injury requires a different progression than general mobility work, and a physical therapist can tailor the approach to your specific situation.
What actually works long-term: a practitioner’s perspective
Most people who come to thoracic mobility work expecting fast results are thinking about it the wrong way. They do a foam-roller session, feel looser for an hour, and then sit at a desk for eight hours and wonder why nothing changed. The drill is not the intervention. The habit is.
Consistency at low intensity beats occasional high-intensity sessions every time. Three to five minutes of thread-the-needle and open-book during a coffee break, done daily, produces more lasting change than a 45-minute mobility circuit done once a week. The nervous system needs repetition to accept a new range as “safe,” and that only happens through frequent, non-threatening exposure.
The other thing most guides miss: thoracic mobility without scapular control is incomplete. You can open the mid-back all you want, but if the shoulder blades are not trained to retract and depress, the posture pattern will reassert itself. Pair these drills with posture correction techniques that address the neck and shoulder system together. That combination is what produces visible, lasting change rather than temporary relief.
Posture resources that go deeper than a single drill
If these drills are giving you a clearer picture of what your mid-back needs, the structured guides at Bestforwardheadposturefix take that work further. The site covers the full posture correction picture: step-by-step exercise banks, ergonomics advice for desk setups, and habit-based strategies for fixing forward head posture at its root rather than managing symptoms.

The thoracic spine does not work in isolation. Forward head posture, neck stiffness, and shoulder tension are all connected, and the guides at Bestforwardheadposturefix address each link in that chain. Readers who want a structured program rather than individual drills will find guided posture plans and deeper resources organized by symptom and goal. Start there if you want a clear sequence rather than a menu of options. Understanding why posture affects your overall health is also worth a read before you build your routine.
Sources
- PubMed
- Thoracic extension/rotation exercise | Elite Performance Institute
- Thoracic spine mobility exercises for a healthier back – LiveEmbody
- Thoracic spine mobility drills for rotation power – Muscle & Fitness