If you have ever felt your chin drifting toward your chest while working on a laptop, you have met the built-in design flaw of portable computing: the screen is permanently attached to the keyboard.
That single hinge makes portability brilliant—but it also forces a trade-off your neck and eyes pay for.
To type comfortably, the keyboard belongs near your hands; to view comfortably, the screen belongs near your eye level.
A clamshell cannot satisfy both at once, so most people choose hand comfort and accept a too-low screen.
The result is predictable: a downward gaze angle, extra neck flexion, less blinking, and a slow creep of strain that builds up across the day.
Safety and ergonomics guidance has long offered simple fixes, yet laptop height still trips up even careful users.
In this guide, bestforwardheadposturefix.com will unpack the optics and biomechanics behind “natural” eye level, how laptops disrupt it, the compounding effects on the neck and eyes, and practical fixes that work at a coffee shop, the couch, or a corporate desk.
Article Index
- Natural Eye Level: What It Is and Why It Matters
- The Laptop Hinge Problem: Why Clamshells Pull Your Gaze Down
- What the Standards Say (and why eye level isn’t a guess)
- Neck Mechanics: How a Few Degrees Become a Big Load
- Vision Mechanics: Downward Gaze, Blink Rate, and Dry Eye
- Real-World Traps: Sofas, Kitchen Tables, and Airplane Seats
- Measurement Made Easy: Heights, Distances, and Angles
- Fast Fixes Anywhere (Home, Office, Travel)
- Special Cases: Bifocals/Progressives, Small Screens, Tall and Petite Users
- A 10-Minute “Laptop Lift” Setup Script
- A 12-Week Habit Plan to Make Good Eye Level Stick
Natural Eye Level: What It Is and Why It Matters
“Natural eye level” is not a vague posture tip—it is a repeatable viewing zone where your eyes and neck work with minimal effort.
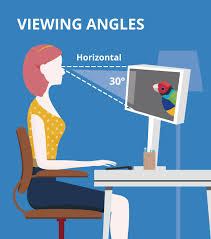
The core idea is straightforward: place the screen directly in front of you, roughly an arm’s length away, with the top of the screen at or just below eye level and the screen center about 15–20° below horizontal gaze.
That slight downward angle leverages your eyelid anatomy so you can look down a bit without bending your neck. Keep the shoulders relaxed, elbows near your sides, and the keyboard slightly below elbow height.
When equipment matches these simple dimensions, your body can stay neutral without constant corrections.
The Laptop Hinge Problem: Why Clamshells Pull Your Gaze Down
A laptop’s single hinge locks the screen low whenever the keyboard is at a comfortable hand height.
Raise the whole device high enough for the screen and the keyboard becomes too high for neutral wrists and relaxed shoulders. Because most people prioritize typing comfort, the screen stays low, and the gaze angle steepens downward.
Over hours, small downward tilts accumulate into real strain. As eyes fatigue, many users inch the device closer and tilt it more, compounding the angle.
Without an external keyboard/mouse or a riser, the clamshell geometry keeps you trapped between bad and worse.
What the Standards Say (and why eye level isn’t a guess)
Ergonomics guidance across agencies and clinical groups converges on a few non-negotiables:
- Top of screen at or slightly below eye level; screen center ~15–20° below straight-ahead gaze.
- Viewing distance ~20–40 inches (about arm’s length), adjusted for font size and visual acuity.
- Monitor centered to your midline (no twisting), with height tweaked for bifocals/progressives.
- Keyboard/mouse positioned so elbows are near 90–120°, shoulders relaxed, wrists straight.
These numbers reflect how neck joints and eye muscles share work most efficiently. They’re not fashion—they’re physics and physiology.
Neck Mechanics: How a Few Degrees Become a Big Load
Your head weighs roughly 10–12 lb in neutral. Tilt it forward and the effective load on the cervical spine climbs steeply with each 15° increment of flexion.
That is why a “little” downward crane at the laptop can feel like a lot by late afternoon. Sustained angles fatigue muscles, compress facet joints, and sensitize tissues.
The practical lesson: every centimeter you lift the screen and every degree you reduce in neck flexion buys you relief. Keep angles small and keep any one posture from owning your day.
Vision Mechanics: Downward Gaze, Blink Rate, and Dry Eye
Laptop screens encourage a larger downward eye angle than a correctly positioned external monitor.
That matters for more than your neck. Digital viewing reduces spontaneous blink rate and increases incomplete blinks, destabilizing the tear film and contributing to digital eye strain: dryness, burning, gritty sensations, and fluctuating focus.
Two habits counter this quickly: (1) keep the screen about an arm’s length away and slightly below eye level, and (2) follow a simple vision break like the 20-20-20 rule—every 20 minutes, look at something 20 feet away for 20 seconds.
Combined with better screen height, these restore blinks and reduce ocular fatigue.
Real-World Traps: Sofas, Kitchen Tables, and Airplane Seats
- Sofa slump. Soft cushions posteriorly tilt the pelvis, round the upper back, and drop the head. With a laptop in your lap, the screen is miles below eye level—guaranteed neck flexion and low blink rate.
- Kitchen-table shuffle. The table height is fixed; chair height often isn’t. Raise the chair to get elbow-level typing and the screen stays low, reinforcing downward gaze.
- Travel mode. Trays and knees limit distance; turbulence limits posture variety. Many users turtle forward to read a dim screen, hiking cervical load and drying eyes in low-humidity cabins.
All three share the same flaw: screen too low for your eyes. The fix is universal—lift the display into your eye zone and keep viewing distance reasonable.
Measurement Made Easy: Heights, Distances, and Angles
You don’t need a protractor:
- Sit tall, look straight ahead, and raise the screen so the top bezel is at or slightly below eye level. Aim to keep the screen center ~15–20° below your straight-ahead line. If you wear progressives or bifocals, lower the screen a touch more so you don’t tip your chin up.
- Start at arm’s length (about 25 inches). If you catch yourself leaning forward, increase text/UI size before moving the screen closer.
- Center the screen. If you work with paper, use a document holder beside the monitor so your eyes, not your neck, do most of the traveling.
Fast Fixes Anywhere (Home, Office, Travel)
At a desk (best practice)
- Raise the laptop on a stand—or even a stack of books—until the top edge meets eye-level guidance.
- Add an external keyboard and mouse. This breaks the clamshell trap so hands and eyes can both be happy.
- Fine-tune: Adjust chair so hips are level with or slightly above knees; keep wrists straight; nudge the screen to minimize glare.
On a sofa
- Use a firm lap desk or cushion stack and sit closer to the edge with your pelvis upright. Even a modest lift reduces neck flexion.
- Take frequent standing microbreaks to reset posture and blink rate.
In a café
- Carry a compact riser plus travel keyboard/mouse. If you can’t, at least increase zoom and brightness, and elevate the screen with whatever’s available (a backpack under the laptop beats nothing).
- Keep the screen perpendicular to your line of sight to avoid glare-squint-lean cycles.
On a plane
- Keep sessions short, raise the screen to the highest hinge angle, and enlarge text to avoid craning.
- When you can, stand and look far away to restore blinks and neutral neck.
At a sit–stand desk
- The same visual rules apply while standing: top of screen at/just below eye level, center below gaze, arm’s length away. (Standing with a low laptop is still a low laptop.)

Special Cases: Bifocals/Progressives, Small Screens, Tall and Petite Users
- Bifocals/progressives. To read through the lower lens segment, people often tip the chin up—stressing the back of the neck. Lower the screen 2–5 cm, increase text size, or consider computer-specific lenses that preserve a neutral head position.
- Small screens. Tiny fonts push you to lean. Scale text and increase distance before accepting neck flexion.
- Very tall users. You’ll likely need a higher riser and careful chair/armrest tuning to keep shoulders relaxed once the screen is lifted.
- Petite users. Eye level may be easy, but feet support is often missing. Add a footrest so you can raise your chair enough for elbow-level typing without letting the screen sink below eye level.
A 10-Minute “Laptop Lift” Setup Script
- Chair first (1 min): Raise the seat so elbows are at or just below 90° when your hands rest on the keyboard. Plant feet (or use a footrest).
- Center and distance (2 min): Put the screen directly in front of you at arm’s length.
- Raise the screen (3 min): Stack books/stand until the top bezel is at or slightly below eye level; aim for the screen center 15–20° below straight-ahead gaze.
- External input (1 min): Plug in an external keyboard/mouse to relax shoulders and keep wrists neutral.
- Glare check (1 min): Nudge the screen and your body so reflections disappear; tilt the display to be perpendicular to your line of sight.
- Vision habit (1 min): Set a gentle reminder for the 20-20-20 rule to restore blink rate and eye comfort.
- Photo & note (1 min): Snap a side photo; jot the number of books/stand height so you can recreate the setup anywhere.
A 12-Week Habit Plan to Make Good Eye Level Stick
Weeks 1–2: See it
- Add a tiny dot on your top bezel; when you notice yourself looking well below it, raise the screen or your gaze.
- Log end-of-day neck/eye comfort (0–10). Expect quick improvement from respecting eye level.
Weeks 3–4: Lift it
- Get a portable riser and compact keyboard/mouse for cafés and travel.
- Re-check distance and scale fonts so you don’t chase legibility by leaning.
Weeks 5–8: Anchor it
- Create two microbreak anchors per hour (e.g., after each email batch, look 20 feet away and do one slow neck retraction).
- Pair breaks with sips of water to keep them automatic.
Weeks 9–12: Audit it
- Take a fresh side-view photo at your desk; compare to Week 1. Less forward-head distance and a level top bezel = success.
- If discomfort persists, troubleshoot in order: screen height → distance → glare → chair/armrests.
Conclusive Analysis
Laptop screens disrupt natural eye level because the clamshell hinge binds screen and keyboard at incompatible heights for your body.
The antidote is simple and repeatable: keep the top of the screen at or just below eye level, center the display directly in front of you, and hold it about an arm’s length away.
When laptops sit low, neck flexion rises, and the effective load on your cervical spine escalates with every extra degree.
At the same time, long digital viewing dampens blink rate and invites dry eye—another nudge to lift the screen and insert regular vision breaks.
Your fixes are practical: elevate the laptop, add an external keyboard/mouse, manage glare, and scale text instead of leaning.
Apply the same rules at a desk, on a sofa, in a café, or on a plane and your neck and eyes will thank you.
Make it a habit with small cues, microbreaks, and a portable riser so good eye level follows you everywhere.
Do this consistently for a few weeks and you will feel the difference: lighter neck, calmer eyes, and work that’s easier to see—without fighting your body all day.
References: